- Downloaded
- 9 GB
- Uploaded
- 33.7 TB
- Ratio
- 3834.75
- Seedbonus
- 369,110
- Upload Count
- 151 (118)
Member for 3 years
Part 1 - How to add Language Packs in my Ultralight Builds
• If You are having issues adding languages to my Ultralight, non updatable builds, even after following this guide, I HIGHLY Recommend trying one of my full featured updatable builds instead. They run just as light and fast as my Ultralight Builds, but offer virtually the same support as an untouched build of Windows. Win Win!
• Adding an additional language pack, and setting it as your system language is possible in my Ultralight builds, but requires a step by step procedure to work properly, which I've outlined in most of my newer threads, but just in case there are still members who are struggling to get their primary language installed and set in my builds, I'd like to share this video following my step by step instructions that are outlined in my 'Language Pack Issues' Spoiler that's found in my threads.
• Hopefully this video helps you guys, and at least shows that it can work without issue if done this way.
• YOU WILL ALSO NEED TO INSTALL THE FONTS HERE TO FIX MISSING CHARACTERS!:
• Good luck everyone, I'll post the instructions here again as well.
Just as an FYI, the build I'm using in this video is
• If you're having issues installing additional language packs, please follow this guide exactly, this method works flawlessly for me in my testing. - REMOVE any additional language packs before proceeding.
Step 1
Turn On Metered Connection.
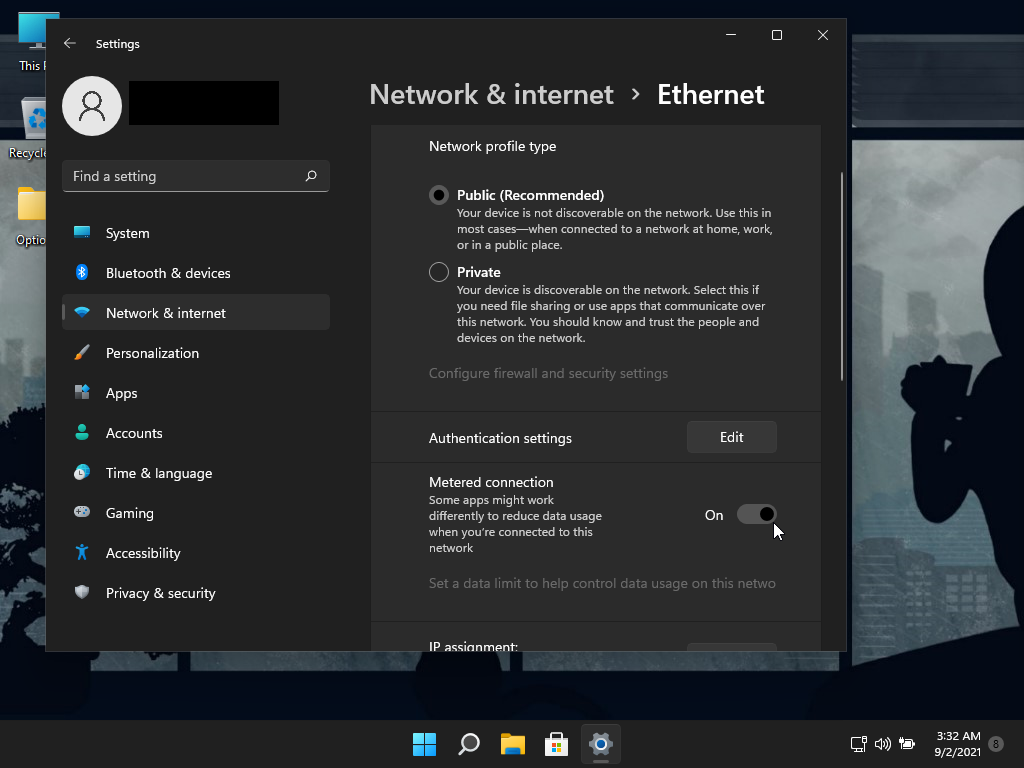
Step 2
Select an additional language to install
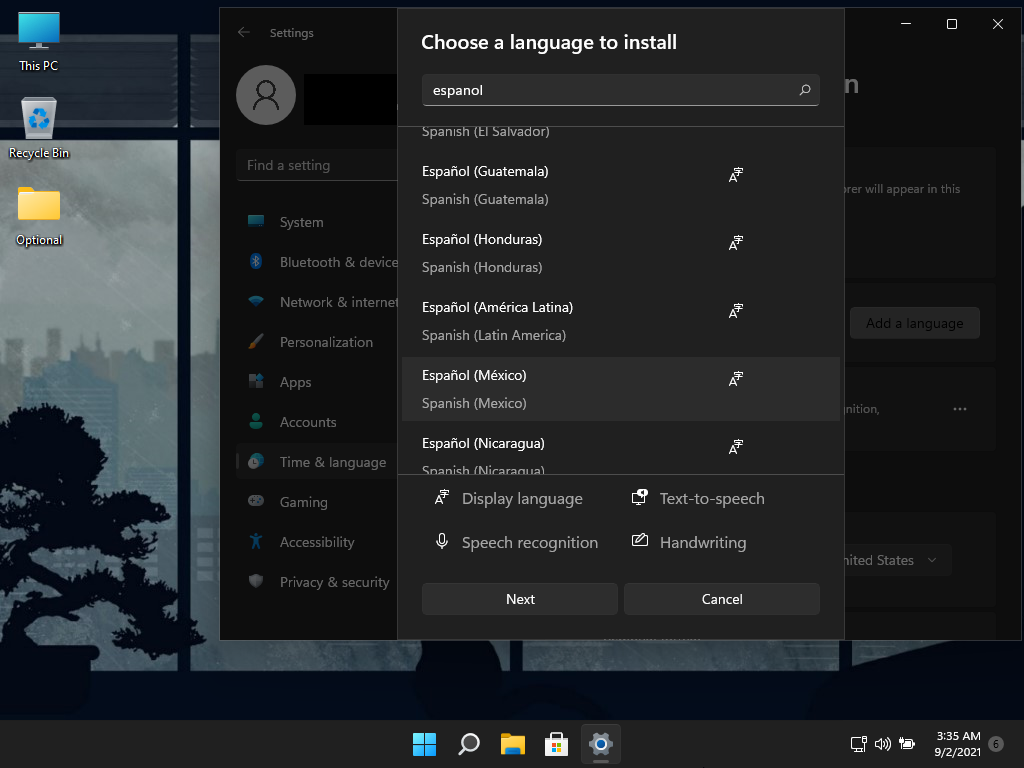
Step 3 (IMPORTANT)
DO NOT check the box 'Set as my Winodws display langauge', and click Install
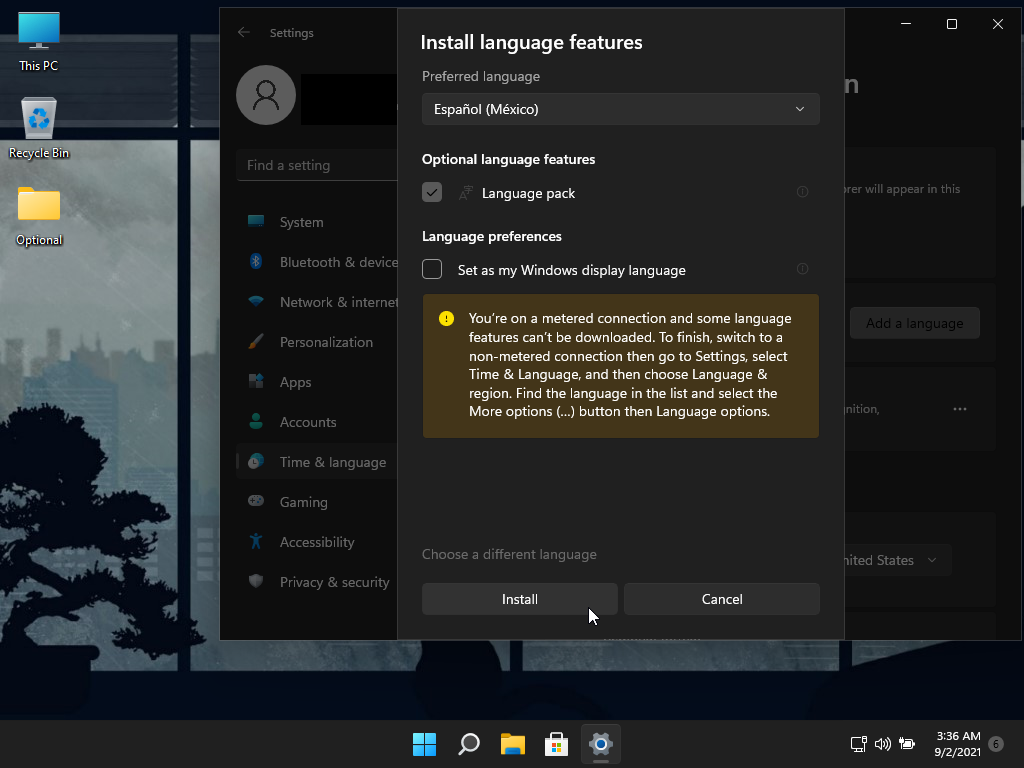
Step 4 (IMPORTANT)
After desired language pack(s) are installed, DO NOT set them as your Winodws Display language yet.
Reboot your PC first. After your PC has been rebooted, then you can proceed to change the Windows Display Language from English, to your desired language, followed by the Prompt to Sign out to apply language settings.
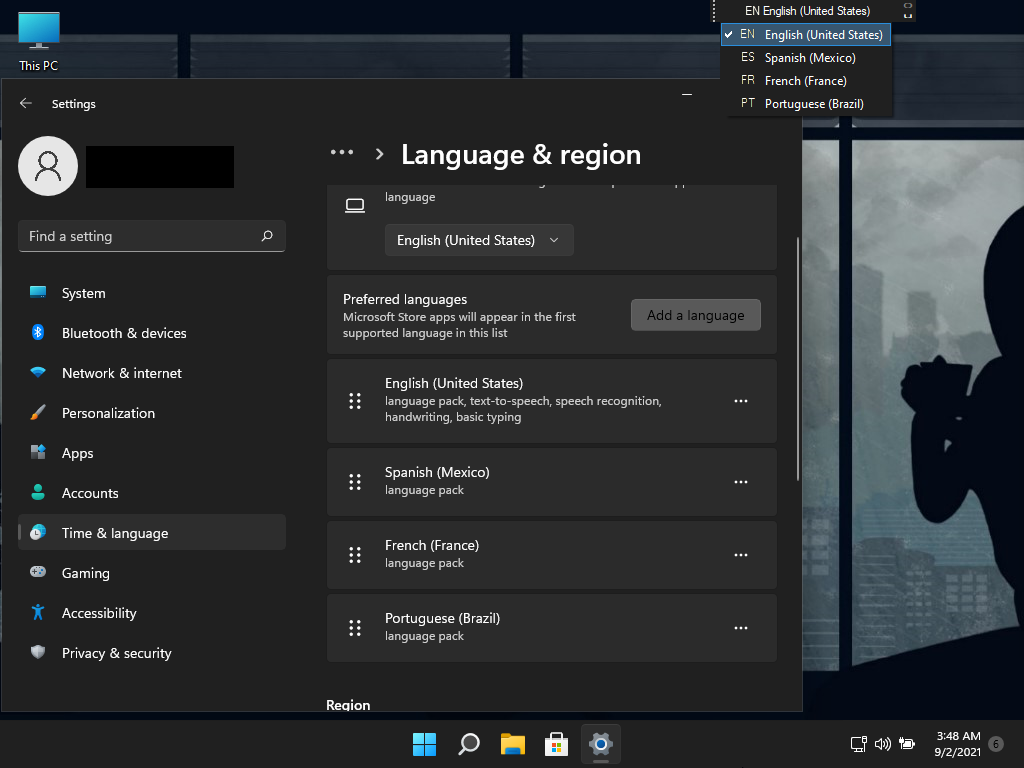
The Screen Shots below show I have 4 languages Installed. After following this tutorial, I was able to change languages, and restart my PC without any issues.
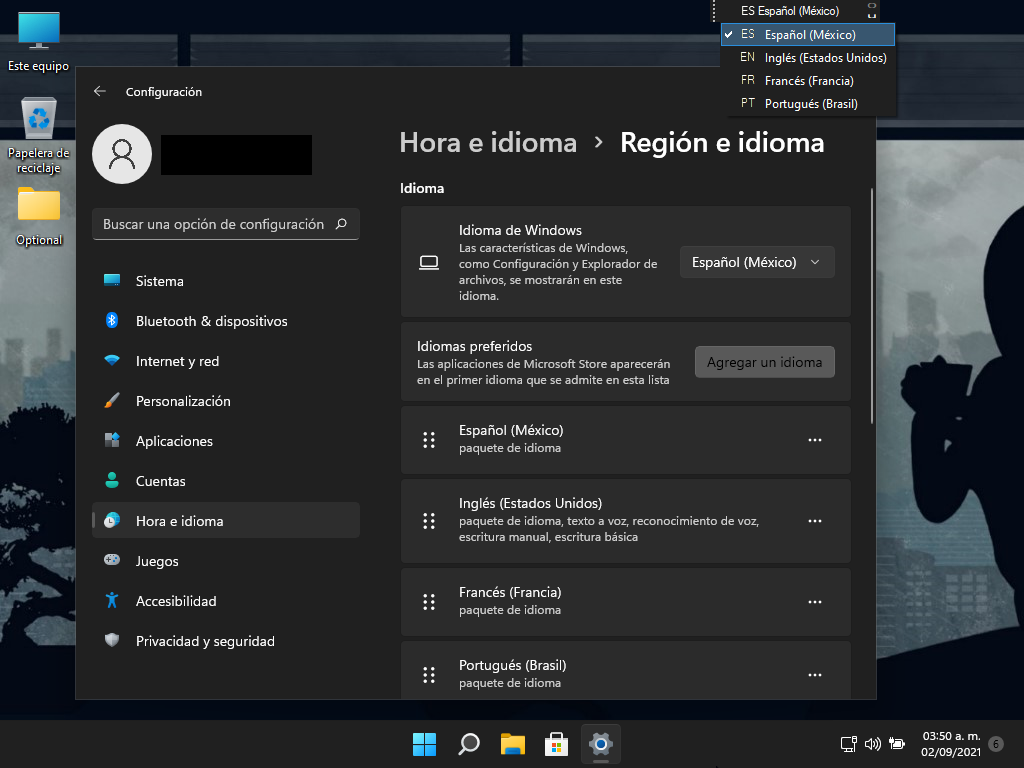
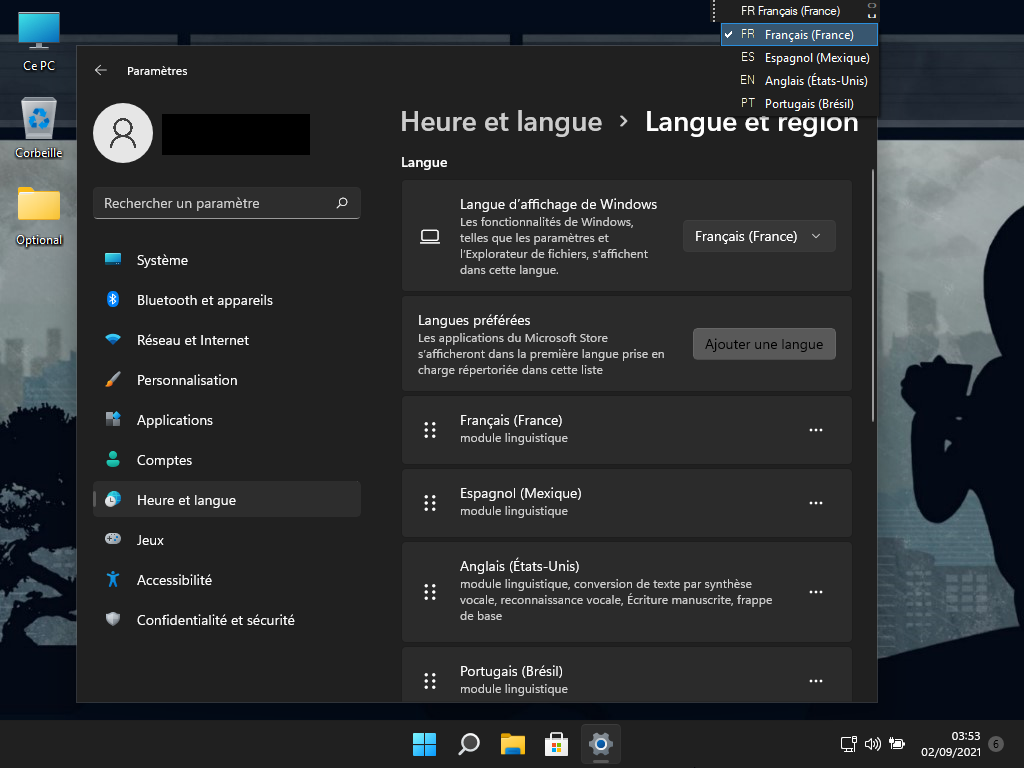
Now your PC should be able to safely shut down and restart without issues.
• Adding an additional language pack, and setting it as your system language is possible in my Ultralight builds, but requires a step by step procedure to work properly, which I've outlined in most of my newer threads, but just in case there are still members who are struggling to get their primary language installed and set in my builds, I'd like to share this video following my step by step instructions that are outlined in my 'Language Pack Issues' Spoiler that's found in my threads.
• Hopefully this video helps you guys, and at least shows that it can work without issue if done this way.
• YOU WILL ALSO NEED TO INSTALL THE FONTS HERE TO FIX MISSING CHARACTERS!:
• Good luck everyone, I'll post the instructions here again as well.
Just as an FYI, the build I'm using in this video is
You must be registered for see links
.• If you're having issues installing additional language packs, please follow this guide exactly, this method works flawlessly for me in my testing. - REMOVE any additional language packs before proceeding.
Step 1
Turn On Metered Connection.
Step 2
Select an additional language to install
Step 3 (IMPORTANT)
DO NOT check the box 'Set as my Winodws display langauge', and click Install
Step 4 (IMPORTANT)
After desired language pack(s) are installed, DO NOT set them as your Winodws Display language yet.
Reboot your PC first. After your PC has been rebooted, then you can proceed to change the Windows Display Language from English, to your desired language, followed by the Prompt to Sign out to apply language settings.
The Screen Shots below show I have 4 languages Installed. After following this tutorial, I was able to change languages, and restart my PC without any issues.
Now your PC should be able to safely shut down and restart without issues.
UPDATE!!
READ THIS TO FIX IF STILL GETTING ERRORS USING ABOVE METHOD!
✨ If this method does not work for you, try the same steps above, but after Language Pack Installation is Complete, instead of Rebooting your PC, Force Shutdown your PC by holding down the power button, to bypass the Update, then Power on your PC to use. Or try the steps Below:
• If you try adding a language pack following my guide, and you still get an error, your PC will reboot a few times, and then return to normal. If this happens, you'll likely notice in the language settings your added language pack isn't available to set as system language.
• So here's how to fix it. Remove the language from the list, then Add the language again, and reboot.
• Then language will be available in the system language list, and you will be able to use it as your System Language. You can also turn metered connection Off if you would like at this point.
• You will now be able to sign out, restart, shut down, and power on, without having the issue again, and the language pack will remain, and be available to use as your main system language.
• Here's a video to illustrate the fix, notice that only the French language wasn't available in the language list, so it was the pack that caused the error. So I removed it, added it again, rebooted, and all worked fine, for all 5 added languages.
You must be registered for see links
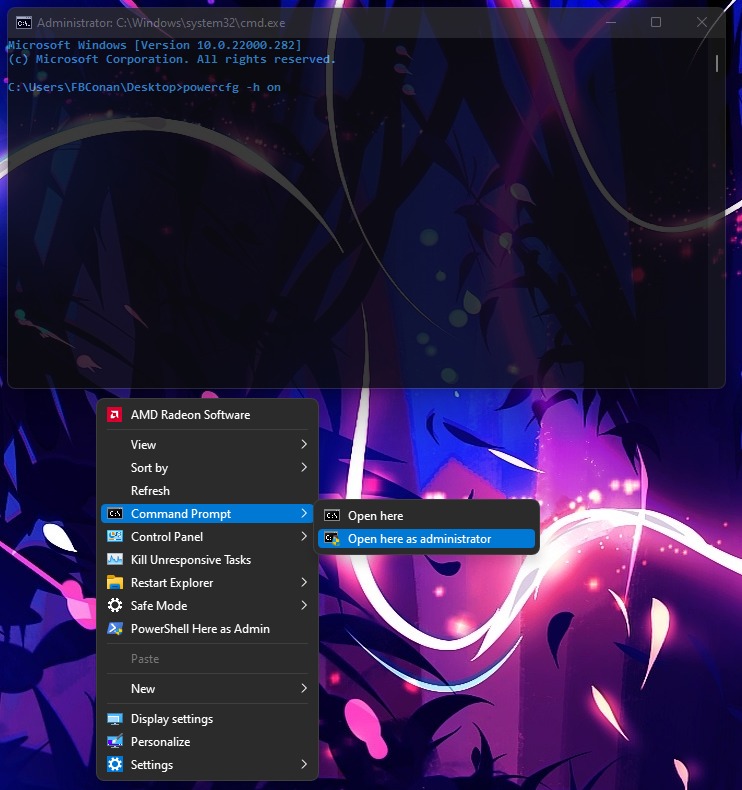
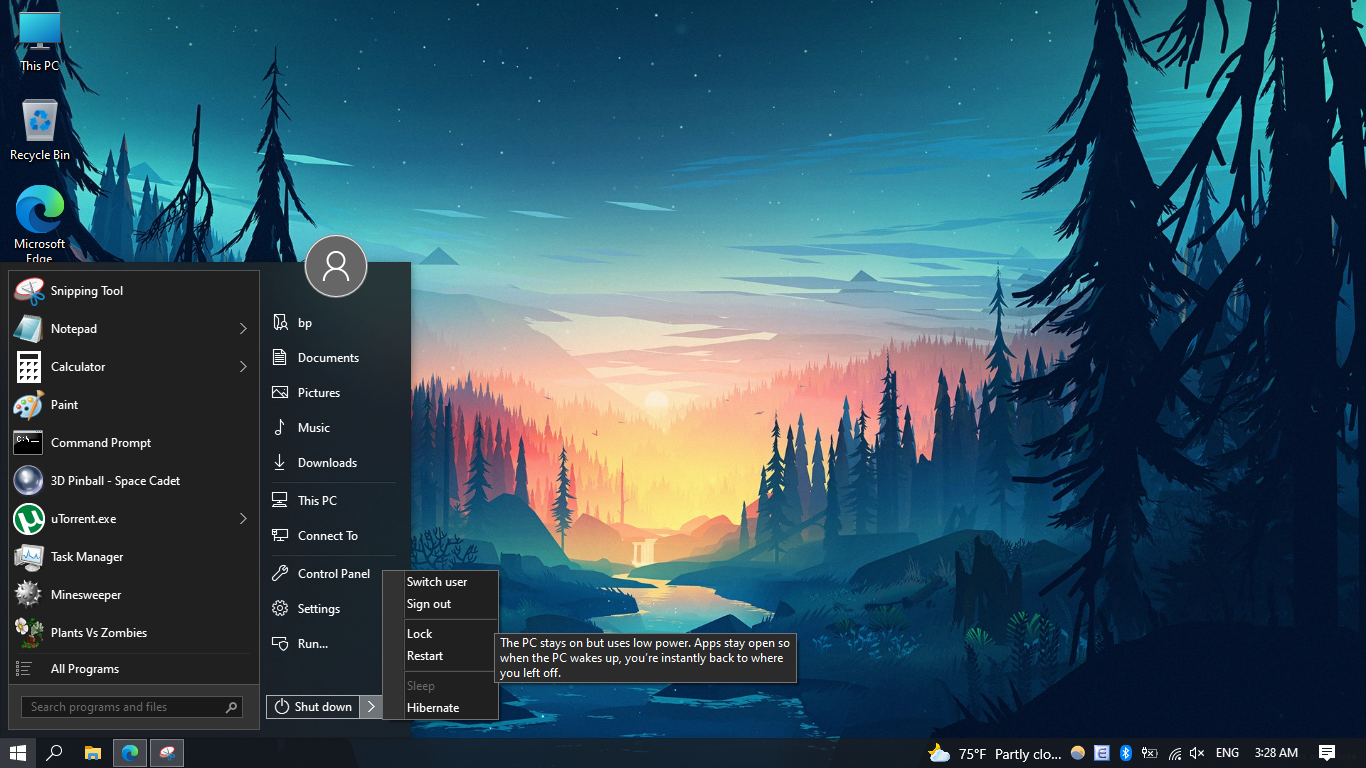
Part 2 - How to Turn on Hibernation in builds that have it Disabled
Step 1 - Open a Command Prompt, and type 'powercfg -h on' and press enter to enable hibernation. Close Command Prompt.
**Bonus Tip - To Disable hibernation, type 'powercfg -h off' in Command Prompt**
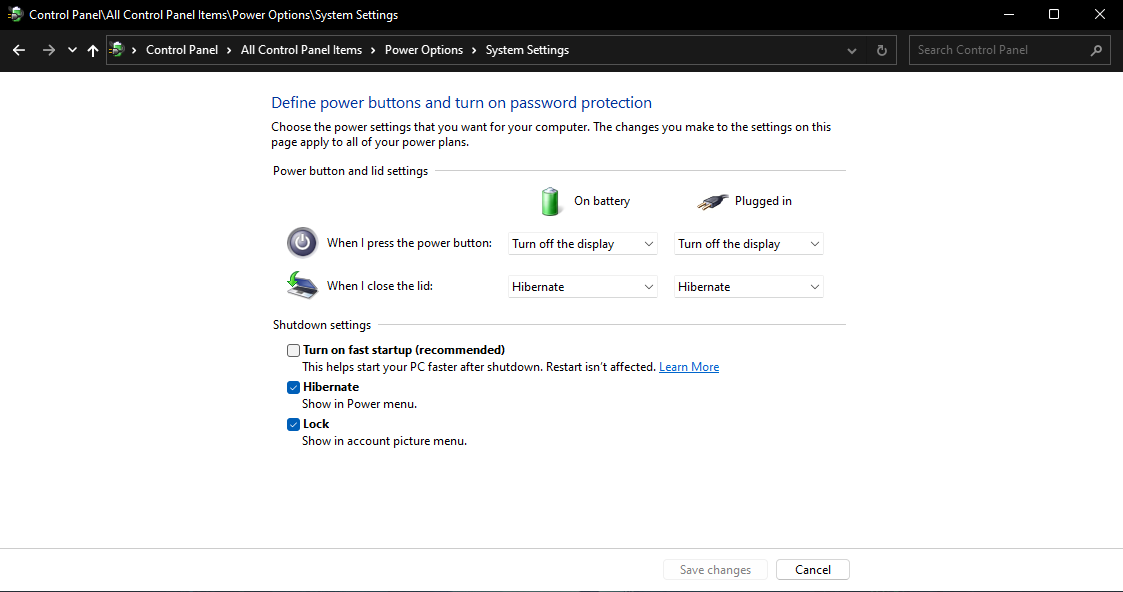
Step 2 - In Control Panel, Open 'Power Options', and click on 'Choose what closing the lid does'
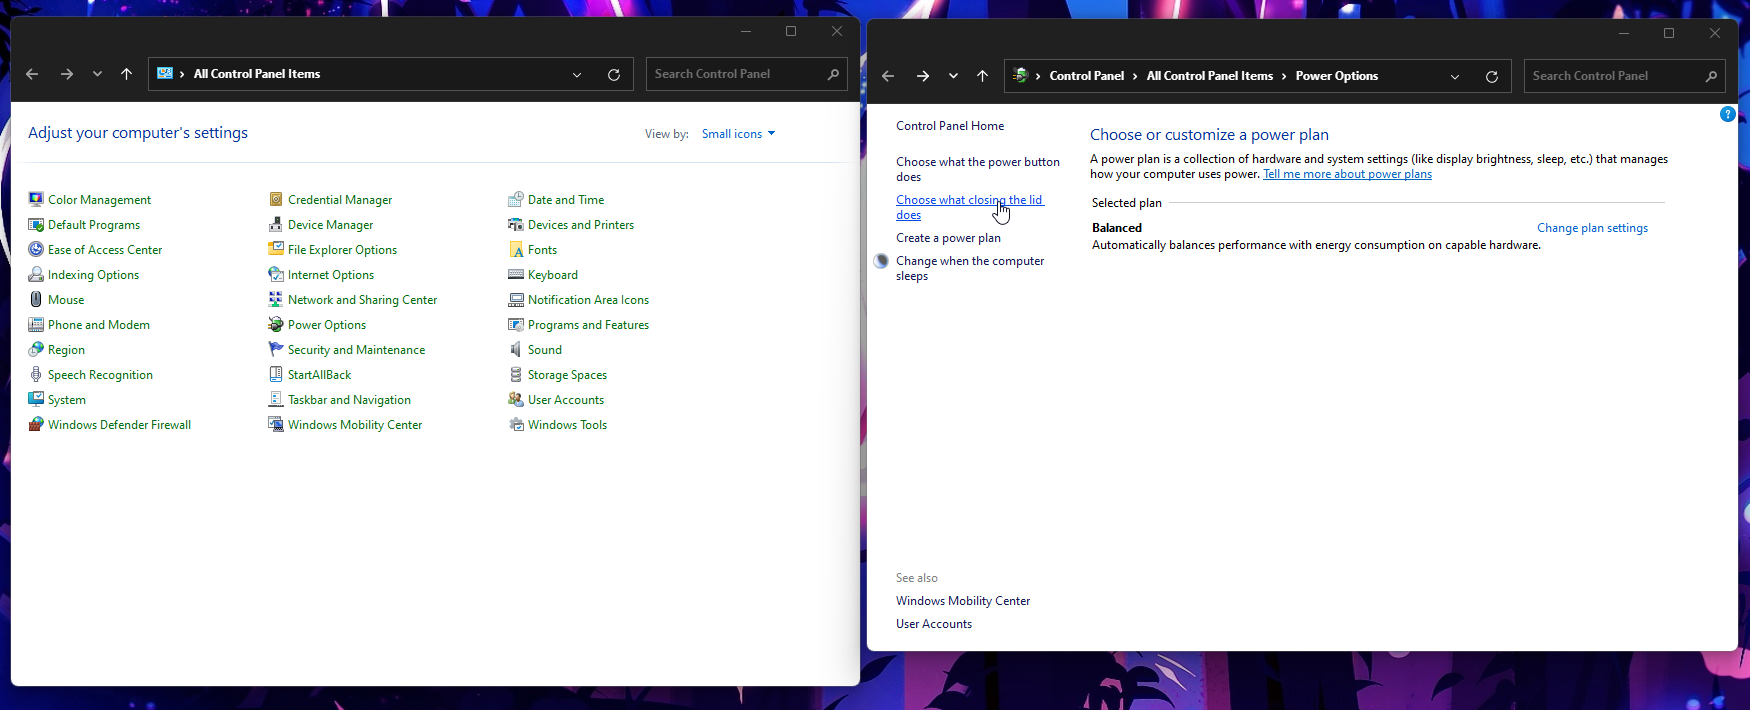
Step 3 - Click on 'Change settings that are currently unavailable'
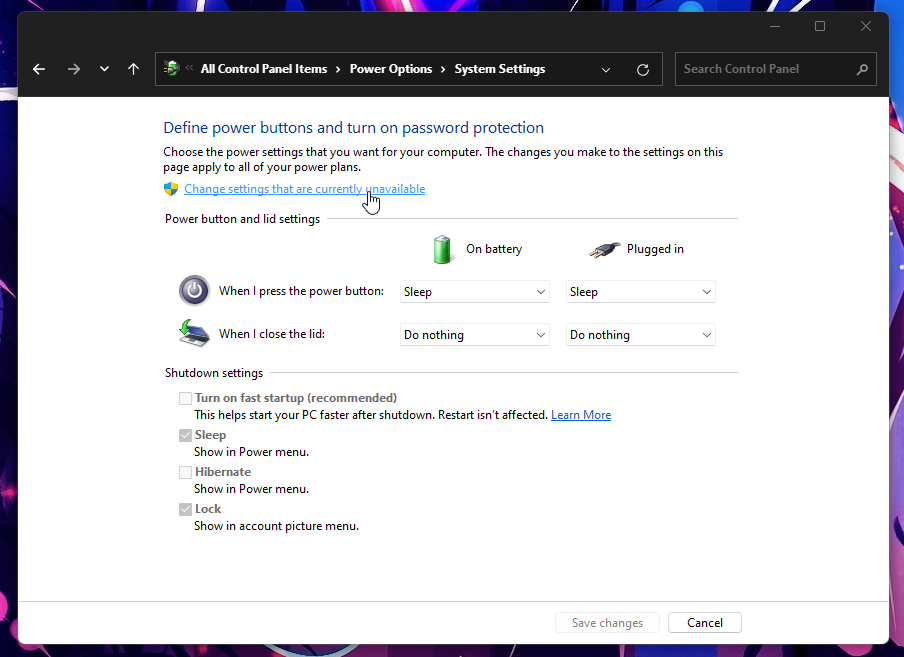
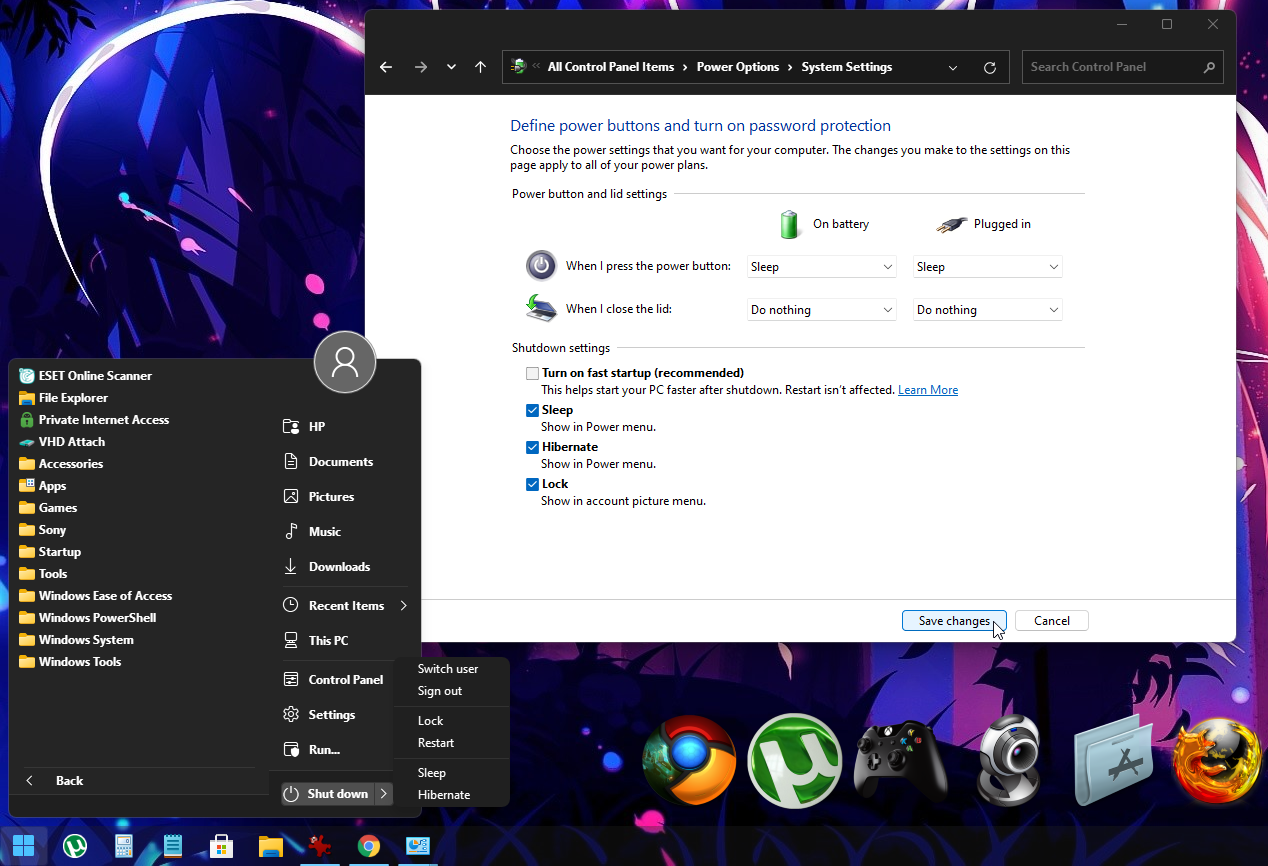
Step 4 - Click the 'Hibernate Box' and hit the 'Save Changes' Button, Hibernate option is now available in Shut Down Options
**Bonus Tip - To Disable hibernation, type 'powercfg -h off' in Command Prompt**
Step 2 - In Control Panel, Open 'Power Options', and click on 'Choose what closing the lid does'
Step 3 - Click on 'Change settings that are currently unavailable'
Step 4 - Click the 'Hibernate Box' and hit the 'Save Changes' Button, Hibernate option is now available in Shut Down Options
Part 3 - How to Turn on Delivery Optimization Service
*If it's disabled, some update features, XBOX games and app downloads might fail*
*If it's disabled, some update features, XBOX games and app downloads might fail*
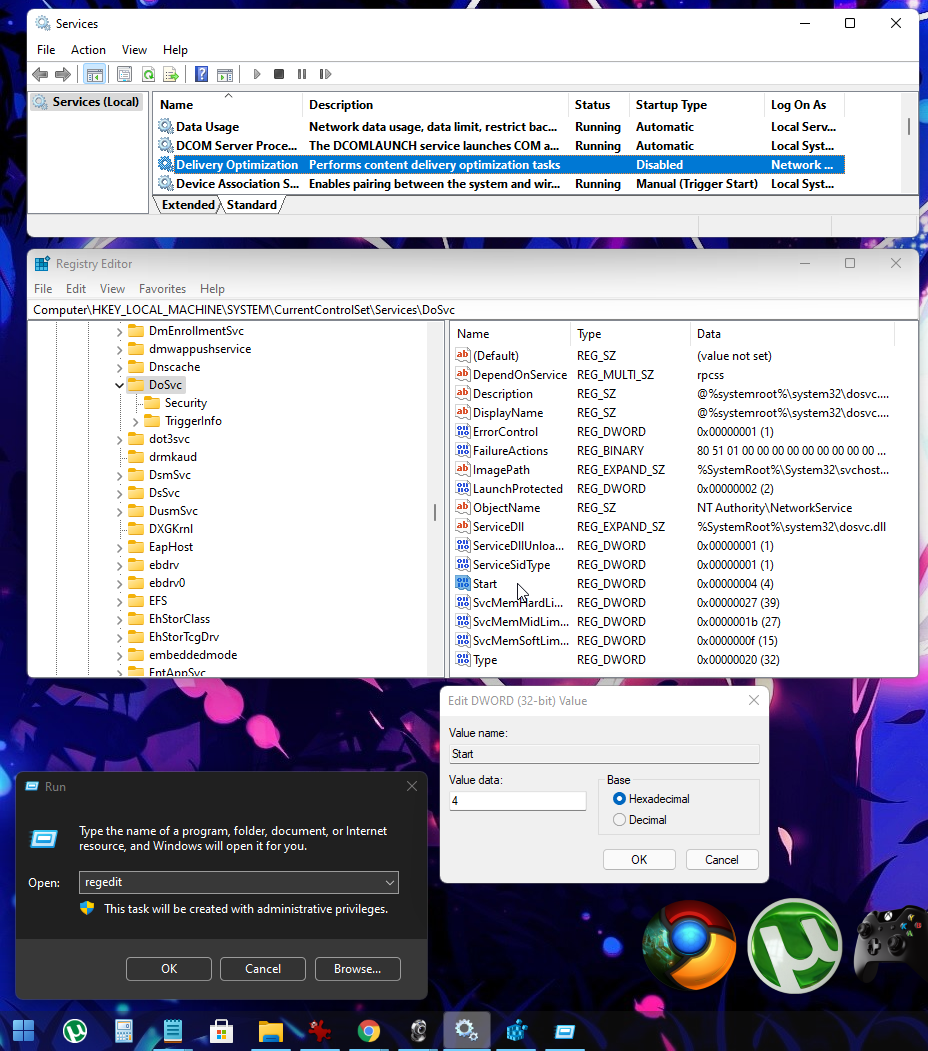
Step 1 - hit Win Key + R (Run) and type 'services.msc'
Locate the 'delivery optimization service' and look at the startup type.
If it says disabled, then keep reading to enable it, and get your ability to download xbox games, as well as some updates, features, and language options as well.
Step 2 - Hit Win Key + R (Run) and type 'regedit'
In the Registry Editor's navigation bar, type the following text:
HKEY_LOCAL_MACHINE\SYSTEM\CurrentControlSet\Services\DoSvc
(and hit enter)
then, double click the 'Start' Entry in the Right hand pane
Change the number from 4, to 2, and click 'OK'
Changing the value from 4 to 2, will change the startup type for the Delivery service from disabled, to automatic.
Step 3 - Reboot your PC, and hit win key + R (Run) and type 'services.msc'
Locate the 'delivery optimization service' and the startup type should now be automatic.
Now your updates, additional language options, xbox games etc should download without issue.
Part 4 - How to add the Microsoft Store to LTSC
*LTSC builds DO NOT come with UWP Apps pre-installed, including the MS Store*
but you can Easily add it if you'd like!
*LTSC builds DO NOT come with UWP Apps pre-installed, including the MS Store*
but you can Easily add it if you'd like!
Step 1 - Download the following file:
Step 2 - Unzip the file to your desired location
Step 3 - Navigate to the folder where you unpacked the zip file,
Then right click on the file 'Add-Store.cmd' and Run as Administrator. The script will run, and do the rest for you. When complete, you'll be able to use the Microsoft Store!
You must be registered for see links
Step 2 - Unzip the file to your desired location
Step 3 - Navigate to the folder where you unpacked the zip file,
Then right click on the file 'Add-Store.cmd' and Run as Administrator. The script will run, and do the rest for you. When complete, you'll be able to use the Microsoft Store!
Part 5 - How to Enable Virtual Memory (Paging File)
All of my custom light builds have virtual memory (paging file) disabled, but if you are running Apps / multiple apps that are exceeding your Physical Memory (RAM) limit, they will crash unexpectedly. - Enable Virtual Memory to Fix this Issue on your PC.
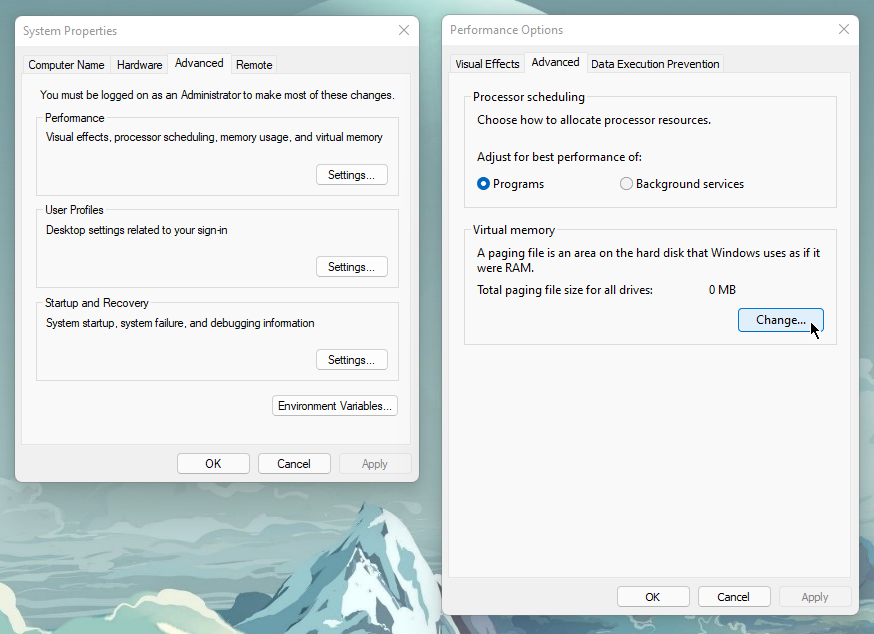
Step 1 - Right click Desktop, go to Control Panel, All Tasks (God Mode) then open the 'View Advanced Settings' shortcut (in the 'system' section), and a Window for 'System Properties' Settings will open. Click on the 'Advanced' Tab at the top.
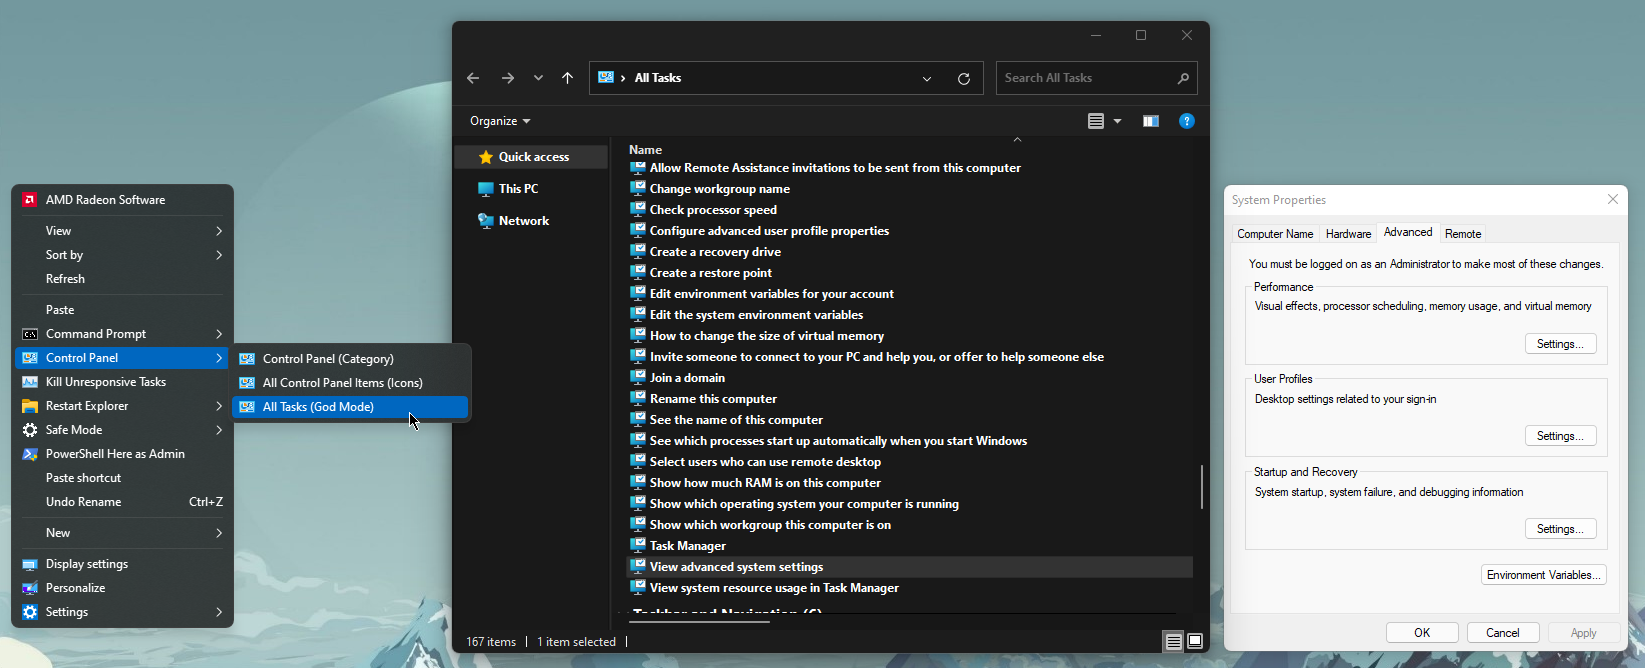
Step 2 - Click on the 'Settings' Button in the Performance Section. Another Window will open, labeled 'Performance Options. You will need to click on the 'Advanced' Tab at the top, then click the the 'Change' Button in the Virtual Memory section to proceed.
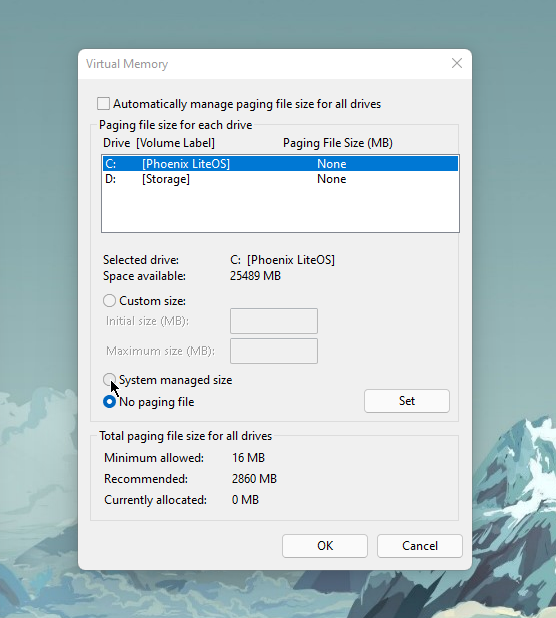
Step 3 - Click the 'System managed size' dot and then hit the 'Set' Button, to enable the recommended Virtual Memory size for your PC. You can also choose a custom size if you would like, but a system managed size should work fine for most users needs.
Step 2 - Click on the 'Settings' Button in the Performance Section. Another Window will open, labeled 'Performance Options. You will need to click on the 'Advanced' Tab at the top, then click the the 'Change' Button in the Virtual Memory section to proceed.
Step 3 - Click the 'System managed size' dot and then hit the 'Set' Button, to enable the recommended Virtual Memory size for your PC. You can also choose a custom size if you would like, but a system managed size should work fine for most users needs.
Part 6 - Fixing Installation Issues
The most common fix for installing my builds, after you write the ISO to USB with Rufus, is to try different USB ports on your PC, if you are getting 'No Driver' Error.
**Switch USB Ports if getting no driver error**
If it still doesn't work, you can download a stock win 10 iso using MS's media creation tool, open the iso from MS in poweriso, go into the sources folder, delete the 'install.esd' or 'install.wim' file. (but still keep the iso open in PowerISO)
Then using 7zip, extract my iso, and put the autounnated.xml file from my root folder, into the root folder of the iso you have open in PowerISO, and the install.esd file that's in my sources folder, into the sources folder of PowerISO, then save as new iso. Try writing that to a USB. Should fix your issues.")
You can drag files from File Explorer to PowerISO to copy over.
Here's a video to illustrate how to do this procedure:
►►
The most common fix for installing my builds, after you write the ISO to USB with Rufus, is to try different USB ports on your PC, if you are getting 'No Driver' Error.
The Windows Setup environment (boot.wim) in my releases is a basic, reduced version that saves hundreds of MB from the original MS boot.wim setup file.
Personally, I've never had a failed install, or setup issues on any of my PC's, ranging from 10 year old laptops, to brand new ones, with HDD, SSD, and NVMe Storage, AMD and Intel CPU's, and both MBR, and GPT partitioned drives.
If you are having issues, please try the following with any of my custom builds, or any other custom build for that matter that you are having an issue installing on your pc:
For anyone who's having / had issues installing my builds! Read This!
Use Rufus. Leave default settings if you have GPT Partitioned HDD (UEFI).
Change settings to the following, if MBR partitioned HDD (BIOS):
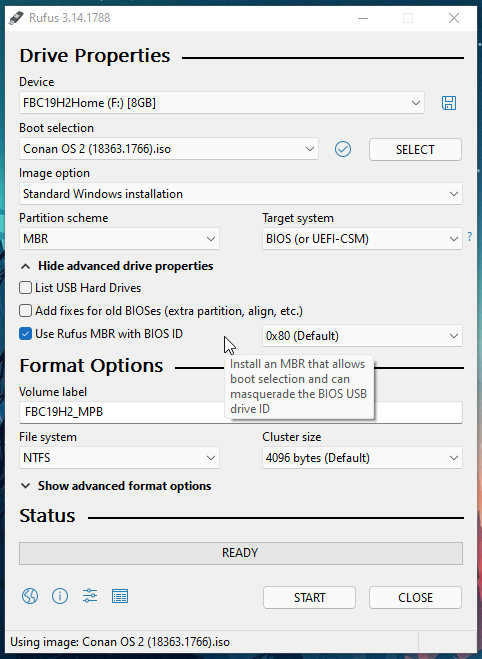
I can confirm, This works on both my BIOS, and UEFI systems, 10 years old, to brand new.
Personally, I've never had a failed install, or setup issues on any of my PC's, ranging from 10 year old laptops, to brand new ones, with HDD, SSD, and NVMe Storage, AMD and Intel CPU's, and both MBR, and GPT partitioned drives.
If you are having issues, please try the following with any of my custom builds, or any other custom build for that matter that you are having an issue installing on your pc:
For anyone who's having / had issues installing my builds! Read This!
Use Rufus. Leave default settings if you have GPT Partitioned HDD (UEFI).
Change settings to the following, if MBR partitioned HDD (BIOS):
I can confirm, This works on both my BIOS, and UEFI systems, 10 years old, to brand new.
**Switch USB Ports if getting no driver error**
If it still doesn't work, you can download a stock win 10 iso using MS's media creation tool, open the iso from MS in poweriso, go into the sources folder, delete the 'install.esd' or 'install.wim' file. (but still keep the iso open in PowerISO)
Then using 7zip, extract my iso, and put the autounnated.xml file from my root folder, into the root folder of the iso you have open in PowerISO, and the install.esd file that's in my sources folder, into the sources folder of PowerISO, then save as new iso. Try writing that to a USB. Should fix your issues.
You can drag files from File Explorer to PowerISO to copy over.
Here's a video to illustrate how to do this procedure:
►►
You must be registered for see links
◄◄
BONUS! - AMD Chipset Drivers
If you are having issues installing AMD Ryzen chipset drivers on your PC on my Windows 11 Builds, I recommend trying the ones I am providing here.
►►
You must be registered for see links
◄◄*Updated April.13.2024*
Last edited:
 Love your builds always brother


 Awesome tutorial FBConan, very precise