- Downloaded
- 5.7 GB
- Uploaded
- 448.6 GB
- Ratio
- 78.11
- Seedbonus
- 134,973
- Upload Count
- 217 (223)
Member for 5 years
How to Enable TPM (Trusted Platform Module) for Windows 11
Modern operating system security features such as Secure Boot and BitLocker are designed to make use of a system’s TPM chip. TPM, or Trusted Platform Module, refers to a motherboard chip that is designed to generate cryptographic keys. TPM-related services can also be extended to virtual machines through the use of a virtual TPM. In most cases, the Windows operating system is able to utilize the underlying TPM without any significant effort on the part of the administrator.
This post shows students and new users steps to enable TPM 2.0 (Trusted Platform Module) so that their PC is compatible to install and run Windows 11, and is also able download and install all Windows updates
Microsoft puts in place some basic requirements in order to install or upgrade to Windows 11. One of these requirements is to have TPM 2.0 enabled in your system UEFI/BIOS.
If your system’s motherboard supports TPM 2.0 but it’s not enabled, you need to go through the UEFI/BIOS setup and enable it so that you can install or upgrade to Windows 11 and continue receiving updates and supports from Microsoft.
TPM is a security technology that increases the system security against software vulnerabilities. TPM allows for use of these Windows features, including BitLocker Drive Encryption, Data Execution Prevention, Windows Hello, Secure Boot and Measured Boot, etc.
TPM version 2.0 chip is installed on systems’ motherboard which is used to provide higher security standards and better reliability than the original TPM version and also compatible with CPUs that supports version 2.0.
With TPM 2.0 enabled, passwords, certificates, or encryption keys are stored on the chip will prevent access to these sensitive data from hackers malicious programs, and that’s why it’s good to have it enabled.
Below we’ll show you how to find out if your PC is TPM 2.0 compatible and/or how to enable it if not.
Method 1 How to verify if PC supports TPM 2.0
As mentioned above, one of Windows 11 requirements is to have TPM 2.0 enabled and CPUs that support it. The easiest way to find out if your PC supports TPM 2.0 is to run the Windows 11 PC Health Check app.
The app will tell you if your PC is compatible and/or have TPM 2.0 enabled.
If you have an AMD Ryzen 2000 CPU or newer, or an Intel 8000-series CPU or newer, then you almost certainly have a processor that supports TMP 2.0 module. If your CPU supports it, then most certainly your motherboard will have it as well.
If you’re unsure of your PC TPM status, use the steps below to find out.
Click on the
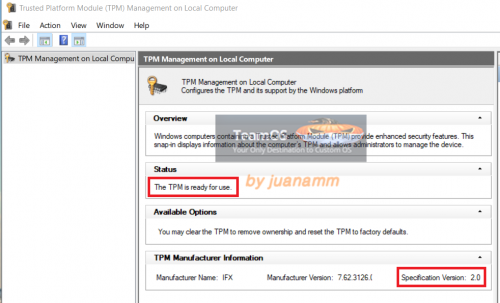
Click the app to open. Once opened, the Status section will display The TPM is ready for use. For Windows 11 the version under TPM Manufacturer information needs to be 2.0.
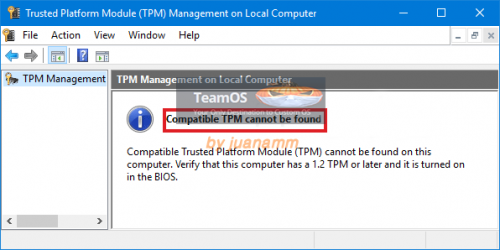
If the program tells you that a compatible TPM is not found, I have bad news, because it means that your computer does not have that TPM chip, and that you will not be able to update to Windows 11. Your computer will not be compatible with the next version of Windows, and you will have to install this chip manually on the motherboard or change computers.
However, it is possible that the system has a TPM chip, but that the TPM is not enabled within the system’s UEFI setup.
Method 2 How to verify if PC supports TPM 2.0
Another alternative to check this is to open PowerShell with administrator permissions and type the command
As you look at the picture above, you will notice that the TpmPresent field is returning a value of False. From the operating system’s perspective it means that Windows does not think that the system is equipped with a TPM chip. In reality, however, it is possible that the system has a TPM chip, but that the TPM is not enabled within the system’s UEFI setup.
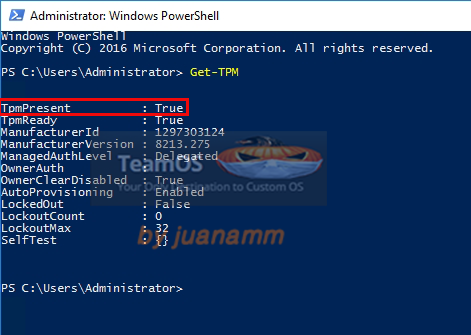
The picture below shows what types of information the Get-TPM cmdlet returns when the TPM is enabled.
How to enable TPM 2.0
If you followed the steps above and discovered TPM 2.0 isn’t enabled, then run the steps below to enable it for your PC.
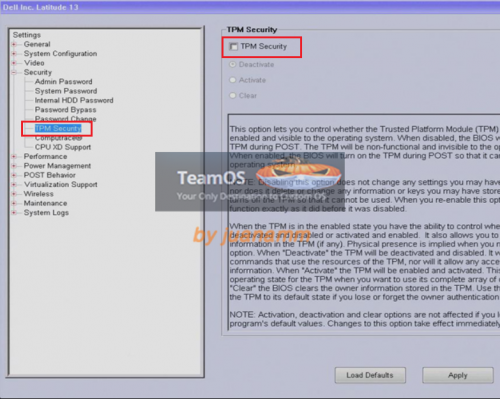
TPM needs to be enabled in the system’s motherboard. To do, reboot or start your PC, and enter the UEFI/BIOS using your motherboard key combination to enter its UEFI/BIOS setup.
For most systems, TPM settings should be located in the
With TPM 2.0 enabled, you should be able to continue with installing or upgrading to Windows 11, if all other requirements are met. Alternatively, press Windows key + I to get to the Settings settings app, then select Update & Security > Windows Security > Device Security. Under the Security processor, confirm its Specification version is 2.0.
That should do it!
How to set up the TPM
As you examine the console, there are a few things that you should be on the lookout for. Begin by checking the console’s Status section. Ideally, you should see a message like the one shown in the figure, indicating that the TPM is ready for use. If you discover that the TPM is not yet ready for use, then try clicking the Prepare the TPM link. If the TPM is healthy, then this link is usually grayed out. However, the link may be available if Windows thinks that the TPM needs to be initialized. You also can initialize the TPM through PowerShell by using the Initialize-TPM cmdlet.
Incidentally, you should be vary careful about preparing, clearing or resetting the TPM. Each of these actions has the potential to erase the cryptographic keys contained within the TPM, which in turn can cause you to lose access to data that has been encrypted using those keys.
The next thing that I recommend checking is the Specification Version. You can find the Specification Version in the console’s TPM Manufacturer Information section. The current TPM version is 2.0. If the Specification Version is 1.2, then you may need to flash your hardware to bring it up to date. Before doing so, however, it is critically important to disable BitLocker and any other security features that depend on TPM.
If your TPM seems to be healthy, but you are still having trouble making it work with a particular security feature, then you can use PowerShell to verify your TPM key attestation. Unfortunately, not all TPMs are created equally, so it can sometimes be helpful to verify your TPM’s capabilities. The easiest way to do this is to simply enter the
As you search for the source of your TPM problems, it is a good idea to check to make sure that the TPM has not been locked out due to unsuccessful authentication attempts. If you look back at Figure 2, you will notice that there is an item on the list called LockedOut. If LockedOut is displaying a value of True, then the TPM is locked. To unlock the TPM, you will need to use PowerShell’s Unblock-TPM cmdlet. Typically you will also have to use the OwnerAuthorization switch to specify the owner authorization value.
Modern operating system security features such as Secure Boot and BitLocker are designed to make use of a system’s TPM chip. TPM, or Trusted Platform Module, refers to a motherboard chip that is designed to generate cryptographic keys. TPM-related services can also be extended to virtual machines through the use of a virtual TPM. In most cases, the Windows operating system is able to utilize the underlying TPM without any significant effort on the part of the administrator.
This post shows students and new users steps to enable TPM 2.0 (Trusted Platform Module) so that their PC is compatible to install and run Windows 11, and is also able download and install all Windows updates
Microsoft puts in place some basic requirements in order to install or upgrade to Windows 11. One of these requirements is to have TPM 2.0 enabled in your system UEFI/BIOS.
If your system’s motherboard supports TPM 2.0 but it’s not enabled, you need to go through the UEFI/BIOS setup and enable it so that you can install or upgrade to Windows 11 and continue receiving updates and supports from Microsoft.
TPM is a security technology that increases the system security against software vulnerabilities. TPM allows for use of these Windows features, including BitLocker Drive Encryption, Data Execution Prevention, Windows Hello, Secure Boot and Measured Boot, etc.
TPM version 2.0 chip is installed on systems’ motherboard which is used to provide higher security standards and better reliability than the original TPM version and also compatible with CPUs that supports version 2.0.
With TPM 2.0 enabled, passwords, certificates, or encryption keys are stored on the chip will prevent access to these sensitive data from hackers malicious programs, and that’s why it’s good to have it enabled.
Below we’ll show you how to find out if your PC is TPM 2.0 compatible and/or how to enable it if not.
Method 1 How to verify if PC supports TPM 2.0
As mentioned above, one of Windows 11 requirements is to have TPM 2.0 enabled and CPUs that support it. The easiest way to find out if your PC supports TPM 2.0 is to run the Windows 11 PC Health Check app.
The app will tell you if your PC is compatible and/or have TPM 2.0 enabled.
If you have an AMD Ryzen 2000 CPU or newer, or an Intel 8000-series CPU or newer, then you almost certainly have a processor that supports TMP 2.0 module. If your CPU supports it, then most certainly your motherboard will have it as well.
If you’re unsure of your PC TPM status, use the steps below to find out.
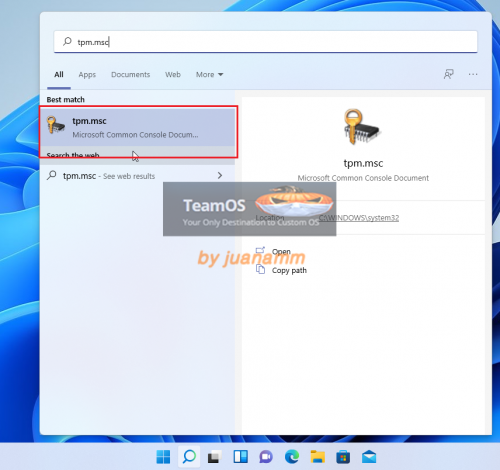
Click on the
Start button, then search for for and select tpm.msc under Best match, as shown in the image below.
Click the app to open. Once opened, the Status section will display The TPM is ready for use. For Windows 11 the version under TPM Manufacturer information needs to be 2.0.
If the program tells you that a compatible TPM is not found, I have bad news, because it means that your computer does not have that TPM chip, and that you will not be able to update to Windows 11. Your computer will not be compatible with the next version of Windows, and you will have to install this chip manually on the motherboard or change computers.
However, it is possible that the system has a TPM chip, but that the TPM is not enabled within the system’s UEFI setup.
Method 2 How to verify if PC supports TPM 2.0
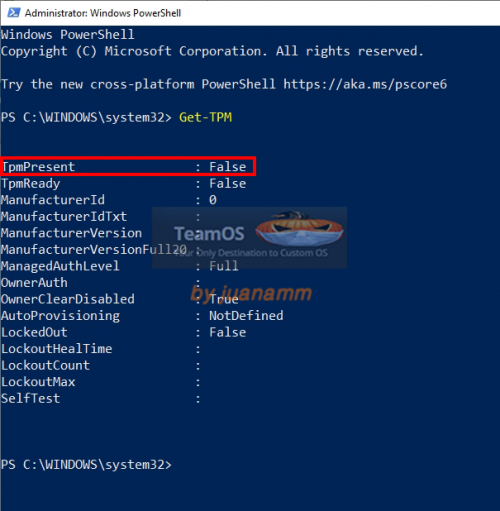
Another alternative to check this is to open PowerShell with administrator permissions and type the command
Get-TPM. This command will show you information about the TPM chip on your computer. If the value of TpmPresent shows False, it means that this chip is not present on the motherboard of your computer.
As you look at the picture above, you will notice that the TpmPresent field is returning a value of False. From the operating system’s perspective it means that Windows does not think that the system is equipped with a TPM chip. In reality, however, it is possible that the system has a TPM chip, but that the TPM is not enabled within the system’s UEFI setup.
The picture below shows what types of information the Get-TPM cmdlet returns when the TPM is enabled.
How to enable TPM 2.0
If you followed the steps above and discovered TPM 2.0 isn’t enabled, then run the steps below to enable it for your PC.
TPM needs to be enabled in the system’s motherboard. To do, reboot or start your PC, and enter the UEFI/BIOS using your motherboard key combination to enter its UEFI/BIOS setup.
For most systems, TPM settings should be located in the
Security or Advanced tab. Once you find the setting, toggle to enable, then save your changes and exit.
With TPM 2.0 enabled, you should be able to continue with installing or upgrading to Windows 11, if all other requirements are met. Alternatively, press Windows key + I to get to the Settings settings app, then select Update & Security > Windows Security > Device Security. Under the Security processor, confirm its Specification version is 2.0.
That should do it!
How to set up the TPM
As you examine the console, there are a few things that you should be on the lookout for. Begin by checking the console’s Status section. Ideally, you should see a message like the one shown in the figure, indicating that the TPM is ready for use. If you discover that the TPM is not yet ready for use, then try clicking the Prepare the TPM link. If the TPM is healthy, then this link is usually grayed out. However, the link may be available if Windows thinks that the TPM needs to be initialized. You also can initialize the TPM through PowerShell by using the Initialize-TPM cmdlet.
Incidentally, you should be vary careful about preparing, clearing or resetting the TPM. Each of these actions has the potential to erase the cryptographic keys contained within the TPM, which in turn can cause you to lose access to data that has been encrypted using those keys.
The next thing that I recommend checking is the Specification Version. You can find the Specification Version in the console’s TPM Manufacturer Information section. The current TPM version is 2.0. If the Specification Version is 1.2, then you may need to flash your hardware to bring it up to date. Before doing so, however, it is critically important to disable BitLocker and any other security features that depend on TPM.
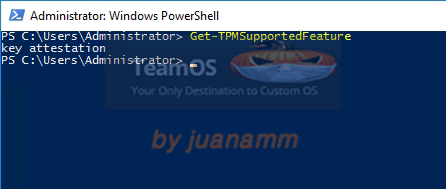
If your TPM seems to be healthy, but you are still having trouble making it work with a particular security feature, then you can use PowerShell to verify your TPM key attestation. Unfortunately, not all TPMs are created equally, so it can sometimes be helpful to verify your TPM’s capabilities. The easiest way to do this is to simply enter the
Get-TPMSupportedFeature cmdlet into PowerShell. Upon doing so, PowerShell will list the supported features, as shown in the next picture.
As you search for the source of your TPM problems, it is a good idea to check to make sure that the TPM has not been locked out due to unsuccessful authentication attempts. If you look back at Figure 2, you will notice that there is an item on the list called LockedOut. If LockedOut is displaying a value of True, then the TPM is locked. To unlock the TPM, you will need to use PowerShell’s Unblock-TPM cmdlet. Typically you will also have to use the OwnerAuthorization switch to specify the owner authorization value.
Last edited:
 Thanks for this juanamm,
")