- Downloaded
- 1.7 TB
- Uploaded
- 51.1 TB
- Ratio
- 29.58
- Seedbonus
- 381,643
- Upload Count
- 0 (0)
Member for 6 years
Just surfing online and came across this interesting article we thought we'd pass along. We take no credit for any information provided, just sharing. Edited for content.
MEMORY LEAKS aren't a new thing for Windows users. Programs pop up from time to time using more RAM than they're meant to, but for those thinking of switching over to Windows 11 tomorrow there's something to bear in mind, in that you could be faced with memory leak issues caused by the OS's own File Explorer.
If you aren't aware of memory leaks as a concept, they're essentially what happens when a certain process that's been running on your PC refuses to release the cache memory space it's been assigned. Sometimes the RAM doesn't free up even long after the program's window has been closed, and that horded memory can cause all sorts of problems by slowing down your machine, and in extreme instances causing it to become unresponsive.
The Windows 11 File Explorer memory leak bug, which surfaced a couple of months ago thanks to the keen eyes of one Windows 11 Insider preview user, is outlined in a post by a user on a WINDOWS 11 blog. They note that with each instance of Windows File Explorer opened, the RAM usage stacks and doesn't disperse upon exiting. The post was met with thousands of upvotes from those with a similar issue, and plenty of comments from users who were able to replicate the issue.
They were currently running version 22000.194 (which we believe is probably the release version) on their test bench, and was able to reliably replicate the bug several times. And, no, the RAM usage still hadn't freed up even after about half an hour of waiting.
If you want to check if this is a problem for your own Windows 11 version, open Task Manager now and sort your processes by highest memory usage, then spam Win+E. You'll notice Explorer rise up the list pretty fast, and once you've closed them all keep an eye out to see if the memory frees up.
There doesn't seem to be an official acknowledgement of the issue anywhere, let alone news of a coming fix. Thankfully it has been logged, so if you can replicate it, do pile in so Microsoft are aware it's a wide-ranging issue.
Of course you can always restart the Windows File Explorer process manually to free up the cache from within the Task Manager. But those who aren't aware of the problem could end up with a pretty clogged cache on upgrading to Windows 11.
Users sporting minimal RAM sizes, and those who don't often restart their PCs, could be faced with major issues if the problems surrounding File Explorer's RAM usage aren't rectified.
----end of article
We haven't tried to replicate it ourselve as of yet, but are keeping a keen eye on all of our systems just for personal awareness.
Edit to thread: Google "memory leak windows 11 file explorer" for many hits on the subject.
This was all we could find googling the hell outta it online. We've since applied it to a workstation at work
with the IT guys and it took care of it. Quite simply, you'll be making a Scheduled Task for purging the Standby List. It's a pretty long detailed procedure, but doable if you take your time. Here's the thread location: SEE SPOILER BELOW
Good Luck")
WINDOWS 11 MEMORY LEAK FIX
This guide will show a step by step procedure in which will be one type of solution. It's quite painless to do and shouldn't take more
than 15 to 20 minutes to complete. Just take your time and follow this and it should be a workable solution for you. Let's begin.
So far this has helped us tremendously with this pain in the back memory leak problem. This should work on Windows 10 as well as the EmptyStandbyList exe is good for Vista and up to Windows 11 operating systems.
We take no credit for its implementation or use. Please comment on any improvements or omissions we may have made. They are most welcomed. Oh, we just Googled and found it. Hope this helps you.
Regards, Alessia & Amelia
TEAMOS
MEMORY LEAKS aren't a new thing for Windows users. Programs pop up from time to time using more RAM than they're meant to, but for those thinking of switching over to Windows 11 tomorrow there's something to bear in mind, in that you could be faced with memory leak issues caused by the OS's own File Explorer.
If you aren't aware of memory leaks as a concept, they're essentially what happens when a certain process that's been running on your PC refuses to release the cache memory space it's been assigned. Sometimes the RAM doesn't free up even long after the program's window has been closed, and that horded memory can cause all sorts of problems by slowing down your machine, and in extreme instances causing it to become unresponsive.
The Windows 11 File Explorer memory leak bug, which surfaced a couple of months ago thanks to the keen eyes of one Windows 11 Insider preview user, is outlined in a post by a user on a WINDOWS 11 blog. They note that with each instance of Windows File Explorer opened, the RAM usage stacks and doesn't disperse upon exiting. The post was met with thousands of upvotes from those with a similar issue, and plenty of comments from users who were able to replicate the issue.
They were currently running version 22000.194 (which we believe is probably the release version) on their test bench, and was able to reliably replicate the bug several times. And, no, the RAM usage still hadn't freed up even after about half an hour of waiting.
If you want to check if this is a problem for your own Windows 11 version, open Task Manager now and sort your processes by highest memory usage, then spam Win+E. You'll notice Explorer rise up the list pretty fast, and once you've closed them all keep an eye out to see if the memory frees up.
There doesn't seem to be an official acknowledgement of the issue anywhere, let alone news of a coming fix. Thankfully it has been logged, so if you can replicate it, do pile in so Microsoft are aware it's a wide-ranging issue.
Of course you can always restart the Windows File Explorer process manually to free up the cache from within the Task Manager. But those who aren't aware of the problem could end up with a pretty clogged cache on upgrading to Windows 11.
Users sporting minimal RAM sizes, and those who don't often restart their PCs, could be faced with major issues if the problems surrounding File Explorer's RAM usage aren't rectified.
----end of article
We haven't tried to replicate it ourselve as of yet, but are keeping a keen eye on all of our systems just for personal awareness.
Edit to thread: Google "memory leak windows 11 file explorer" for many hits on the subject.
This was all we could find googling the hell outta it online. We've since applied it to a workstation at work
with the IT guys and it took care of it. Quite simply, you'll be making a Scheduled Task for purging the Standby List. It's a pretty long detailed procedure, but doable if you take your time. Here's the thread location: SEE SPOILER BELOW
Good Luck
WINDOWS 11 MEMORY LEAK FIX
This guide will show a step by step procedure in which will be one type of solution. It's quite painless to do and shouldn't take more
than 15 to 20 minutes to complete. Just take your time and follow this and it should be a workable solution for you. Let's begin.
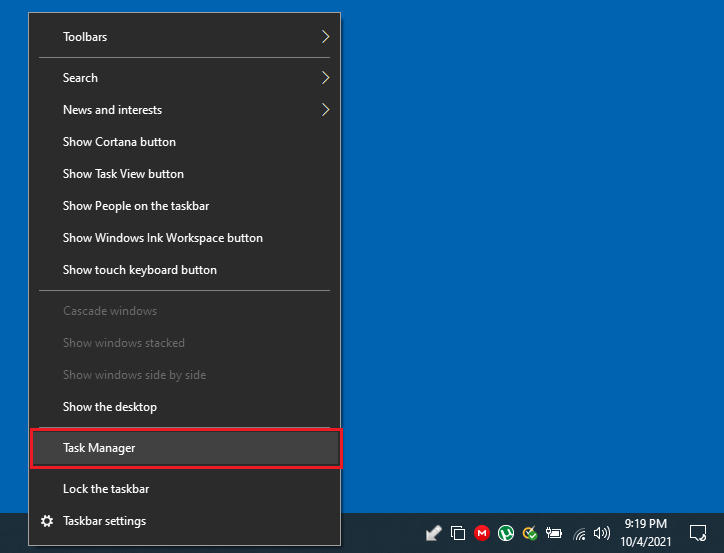
OPEN TASK MANAGER
A. On your TASKBAR, right click and select Task Manager.
B. Select Performance Tab then on bottom select OPEN RESOURCE MONITOR
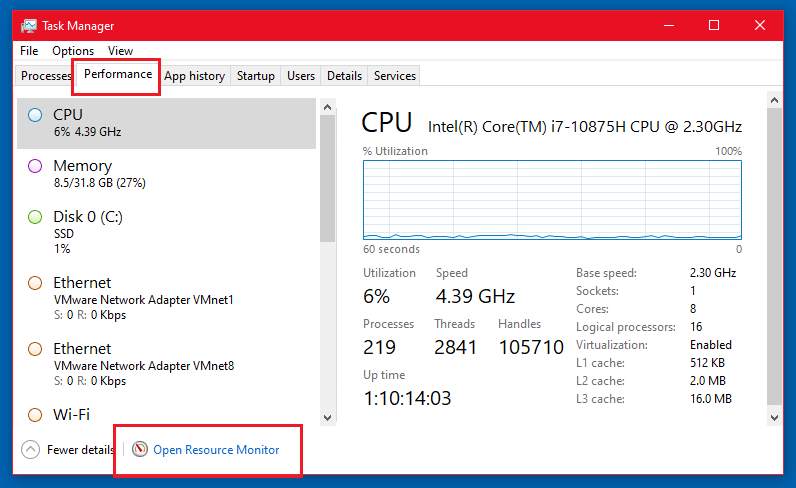

Viewing the PHYSICAL MEMORY useage, you will see the memory allocation and current amount In Use, Modified, Standby and Hardware Reserved.
The light blue section shows the available free memory. This will fill up during normal everyday tasks such as gaming, videos, files and documents being used etc...Normally all you would have to do is REBOOT your system and then
check how much lower it will be. But this is a PROGRESSIVE MEMORY LEAK. To fix it, we need to download a small program called
EmptyStandbyList.exe you may Google this and is a safe download of more than 9 million downloads and counting.
STEP 1:
First of all, download Empty Standby List for free
You may Google Empty Standby List , it's an executable safe download of over 9 million downloads and counting.
After completing the software download, please move or copy the tool to the C: Windows drive on the computer .
STEP 2
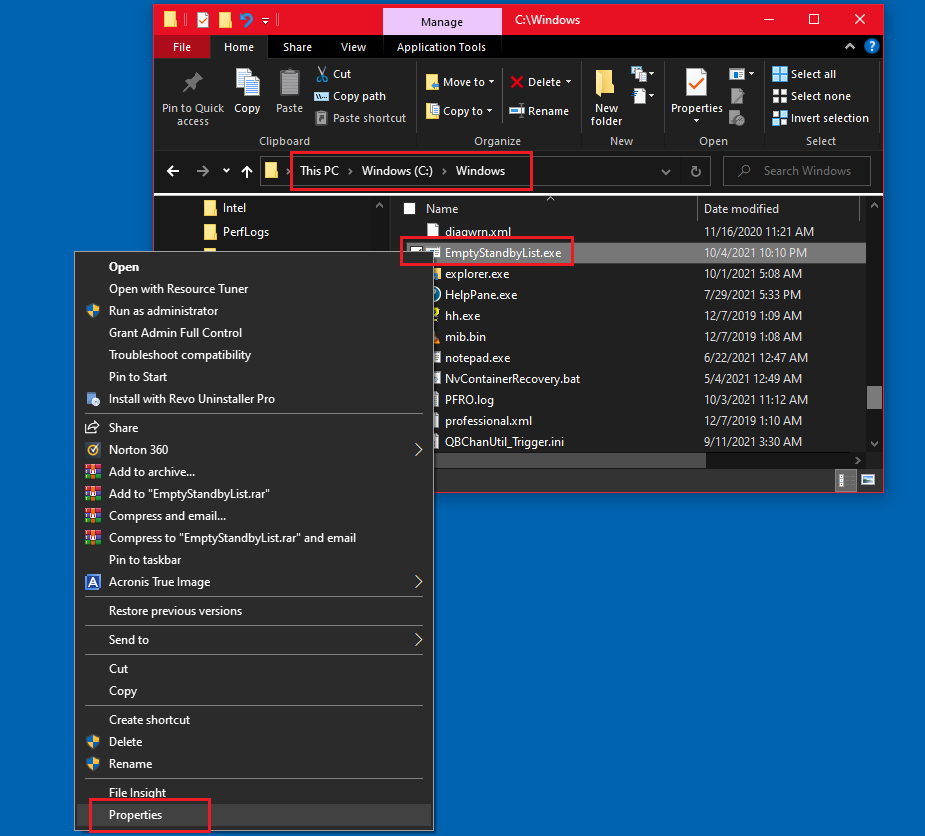
1. RIGHT CLICK and select Properties
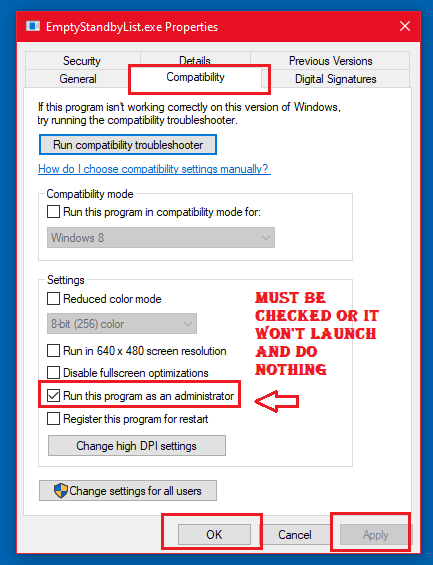
2. Select COMPATIBILITY tab and check box below RUN THIS PROGRAM AS AN ADMINISTRATOR.
This box MUST be checked or it will not launch. Nothing will happen. Click Apply then OK.
STEP 3
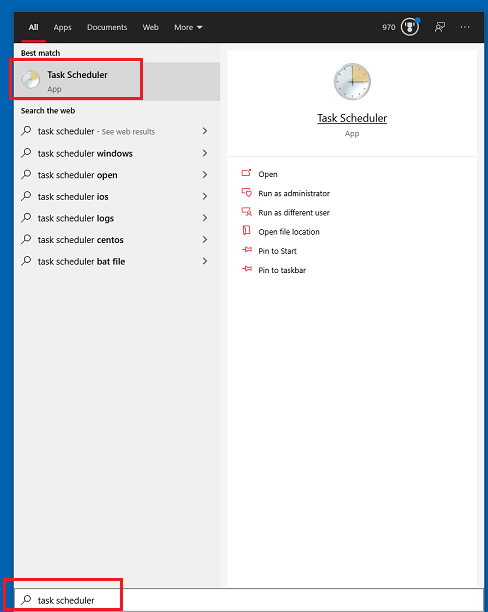
1. In Search Box Type TASK SCHEDULER and press Enter The Task Scheduler window will then open.
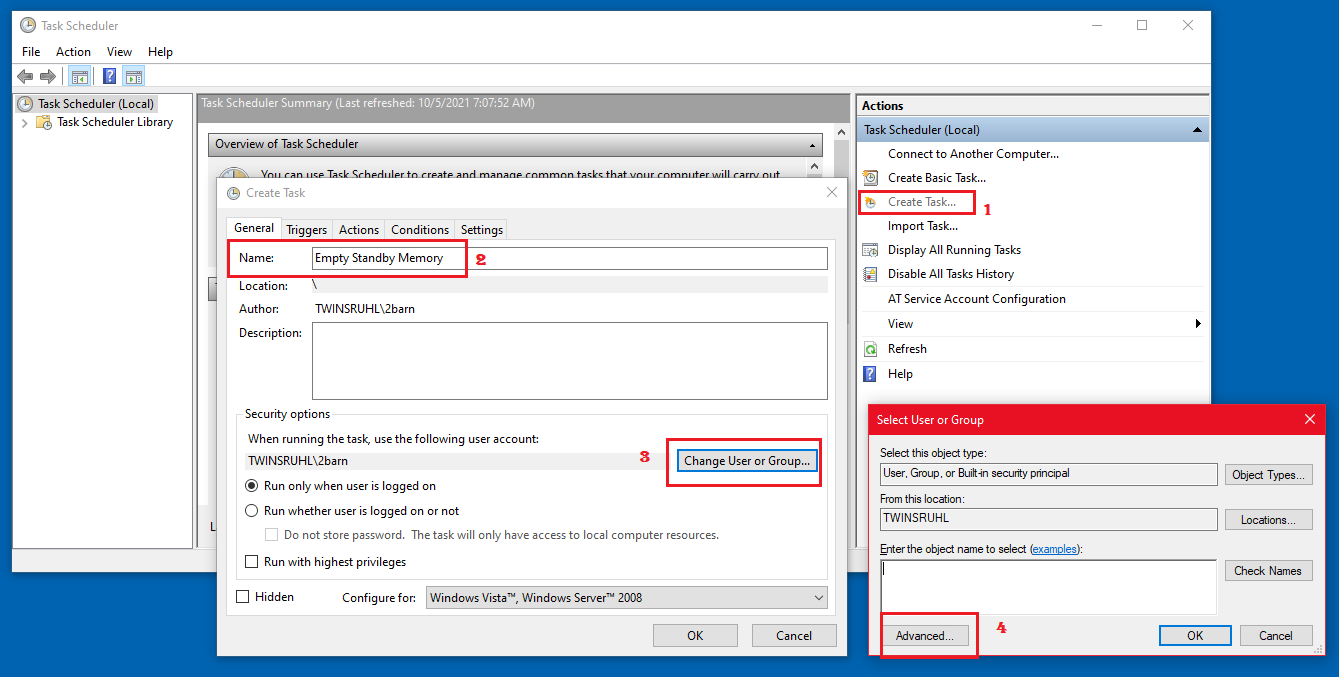
2. On Right side, select CREATE TASK
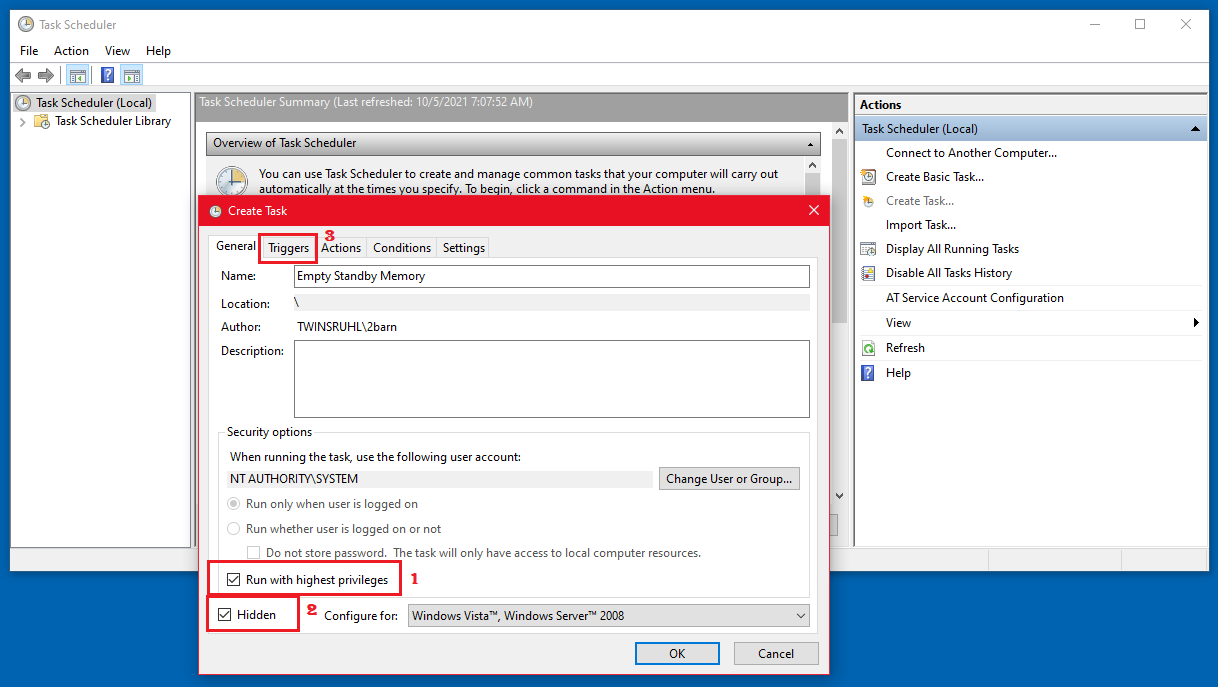
Create task window will open. Name it Empty Standby Memory. Then click on Change User or Group.
and in next popup click Advanced.
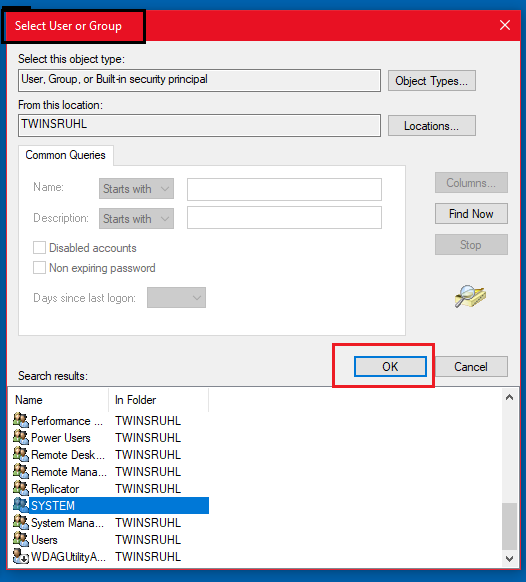
3. On next window, click Find Now. Scroll down and select SYSTEM and click OK.
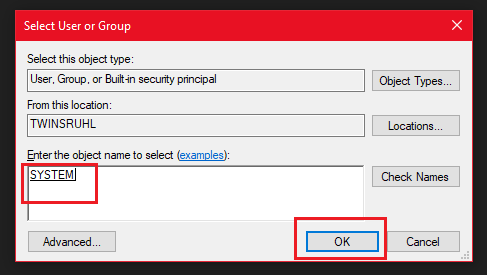
4. You will now see it in the Select User or Group window. Click OK.
5. In the Create Task Window go down and check Run with Highest Privileges and Hidden. Then select Triggers Tab
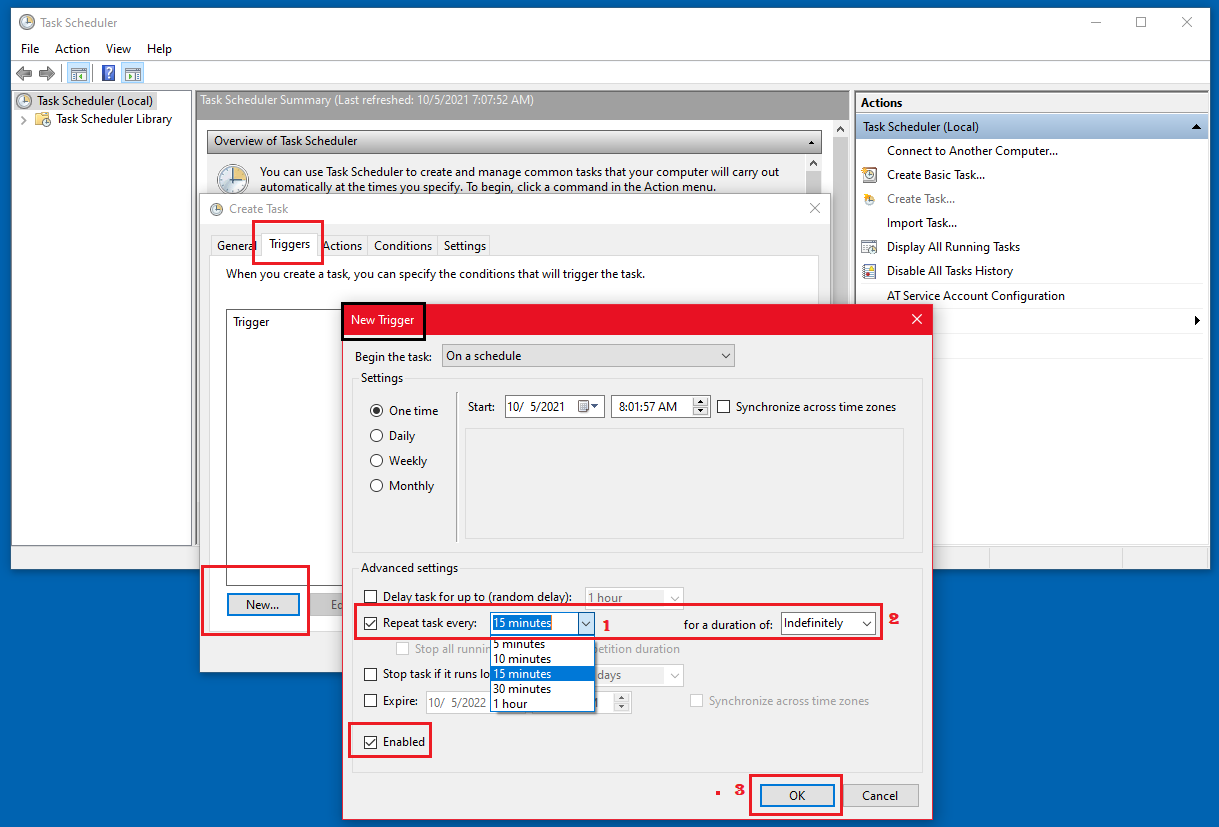
6. Go to bottom of Triggers window and select NEW. A second window will pop up. This is where we set our trigger.
In New Trigger window, go to Advanced settings below and now you have the choice of how often this will run.
Select Repeat Task every: 5 10 15 30 minutes or 1 hour. NOTE: The less memory you have the more often you should
run it. Example. 4 to 8 gig memory, 15 minutes. Then set the duration to INDEFINITELY. Make sure Enabled Box is
checked! then press OK.
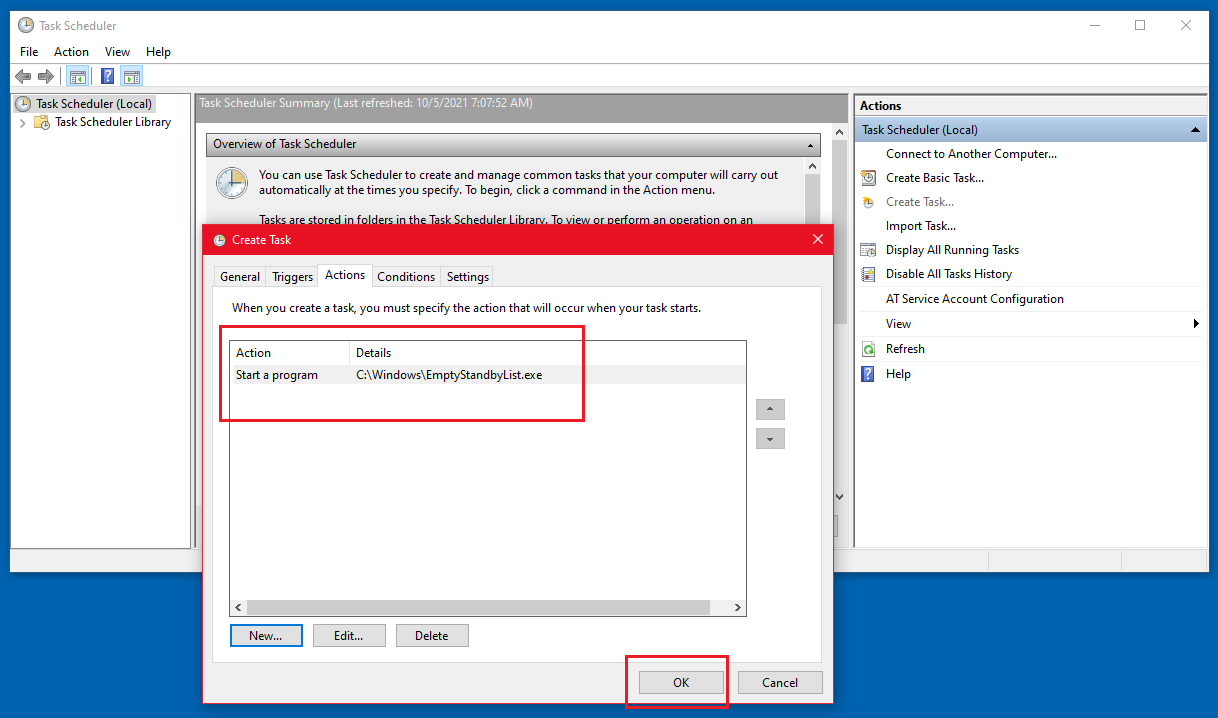
7. Next is the ACTIONS tab. Select New. This is where you are going to navigate to the executable. Click on Browse
and navigate to where you placed the executable. Double click on it to open it.
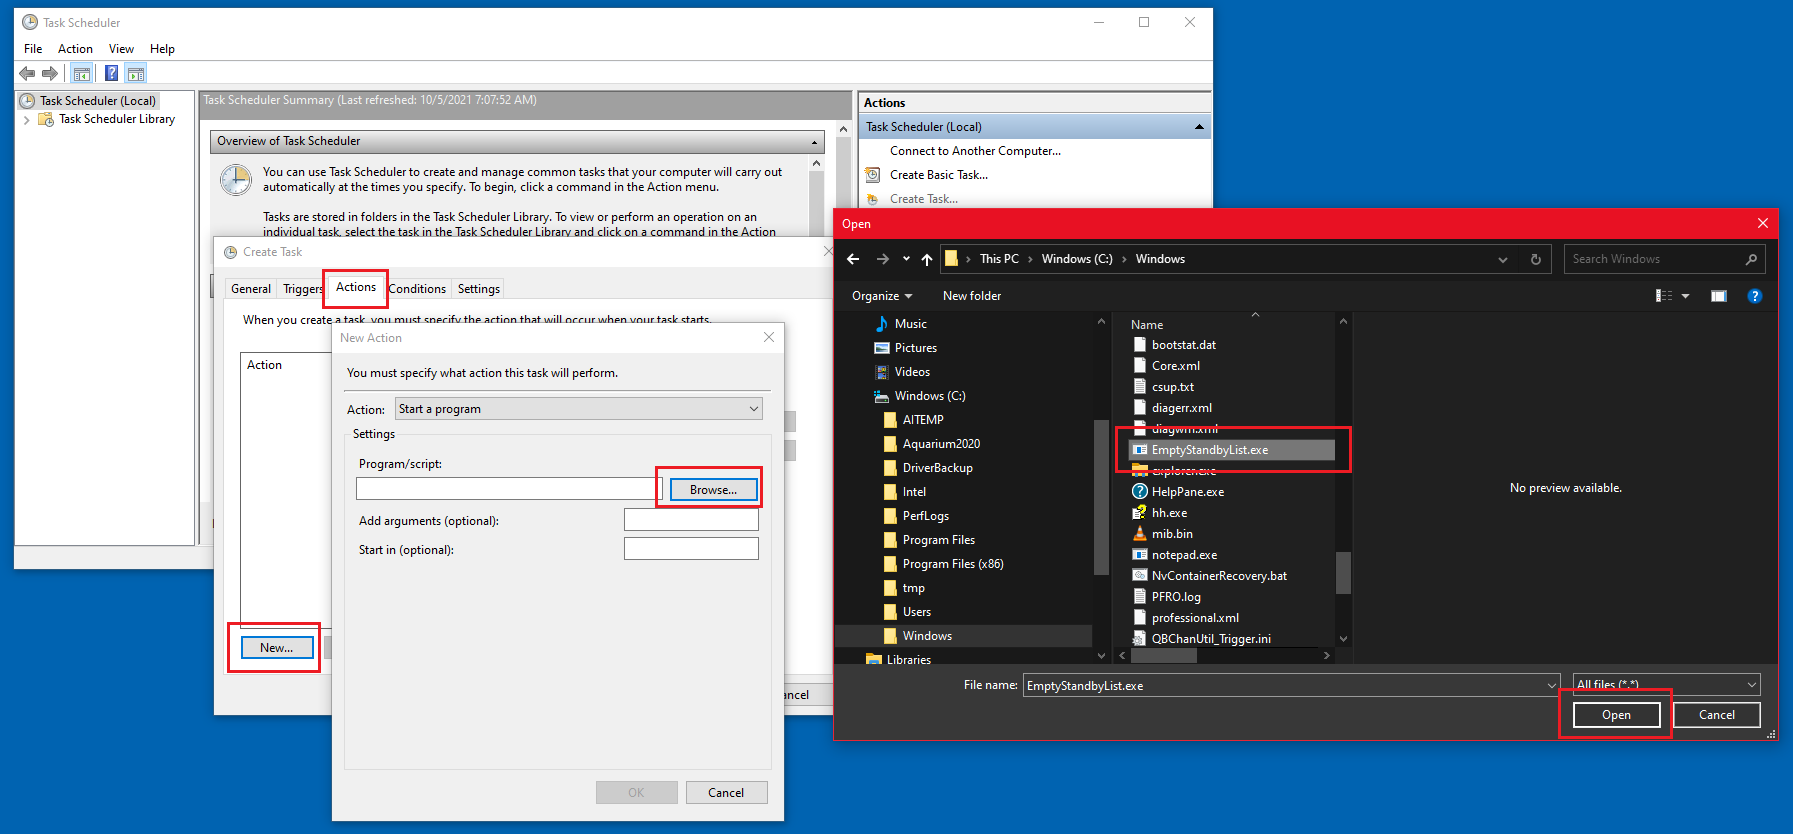
8.Once it's populated in the Program/script box, select OK
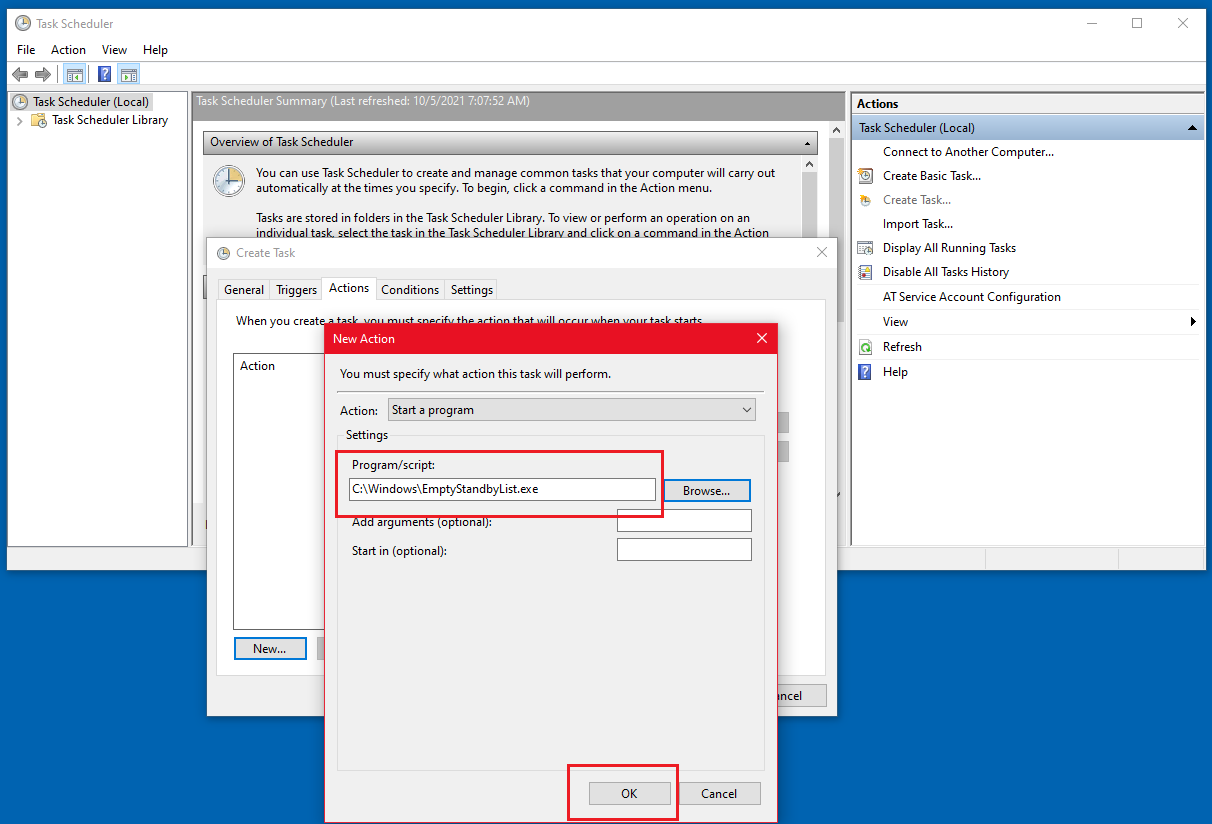
9. You're all done, select OK at bottom of Create Task Window.
A. On your TASKBAR, right click and select Task Manager.
B. Select Performance Tab then on bottom select OPEN RESOURCE MONITOR
Viewing the PHYSICAL MEMORY useage, you will see the memory allocation and current amount In Use, Modified, Standby and Hardware Reserved.
The light blue section shows the available free memory. This will fill up during normal everyday tasks such as gaming, videos, files and documents being used etc...Normally all you would have to do is REBOOT your system and then
check how much lower it will be. But this is a PROGRESSIVE MEMORY LEAK. To fix it, we need to download a small program called
EmptyStandbyList.exe you may Google this and is a safe download of more than 9 million downloads and counting.
STEP 1:
First of all, download Empty Standby List for free
You may Google Empty Standby List , it's an executable safe download of over 9 million downloads and counting.
After completing the software download, please move or copy the tool to the C: Windows drive on the computer .
STEP 2
1. RIGHT CLICK and select Properties
2. Select COMPATIBILITY tab and check box below RUN THIS PROGRAM AS AN ADMINISTRATOR.
This box MUST be checked or it will not launch. Nothing will happen. Click Apply then OK.
STEP 3
1. In Search Box Type TASK SCHEDULER and press Enter The Task Scheduler window will then open.
2. On Right side, select CREATE TASK
Create task window will open. Name it Empty Standby Memory. Then click on Change User or Group.
and in next popup click Advanced.
3. On next window, click Find Now. Scroll down and select SYSTEM and click OK.
4. You will now see it in the Select User or Group window. Click OK.
5. In the Create Task Window go down and check Run with Highest Privileges and Hidden. Then select Triggers Tab
6. Go to bottom of Triggers window and select NEW. A second window will pop up. This is where we set our trigger.
In New Trigger window, go to Advanced settings below and now you have the choice of how often this will run.
Select Repeat Task every: 5 10 15 30 minutes or 1 hour. NOTE: The less memory you have the more often you should
run it. Example. 4 to 8 gig memory, 15 minutes. Then set the duration to INDEFINITELY. Make sure Enabled Box is
checked! then press OK.
7. Next is the ACTIONS tab. Select New. This is where you are going to navigate to the executable. Click on Browse
and navigate to where you placed the executable. Double click on it to open it.
8.Once it's populated in the Program/script box, select OK
9. You're all done, select OK at bottom of Create Task Window.
So far this has helped us tremendously with this pain in the back memory leak problem. This should work on Windows 10 as well as the EmptyStandbyList exe is good for Vista and up to Windows 11 operating systems.
We take no credit for its implementation or use. Please comment on any improvements or omissions we may have made. They are most welcomed. Oh, we just Googled and found it. Hope this helps you.
Regards, Alessia & Amelia
TEAMOS

")