shhnedo
Member
- Downloaded
- 15.5 GB
- Uploaded
- 488.7 GB
- Ratio
- 31.45
- Seedbonus
- 35
- Upload Count
- 5 (5)
Member for 8 years
How to modify a Windows 7 ISO so it can be installed and used on a modern Intel/AMD platform.
DISCLAIMER #1: I AM NOT SOME SORT OF PERSONAL TECH SUPPORT! I AM ONLY SHOWING YOU HOW TO PERFORM THE FOLLOWING MODIFICATIONS! I WILL NOT BE RESPONSIBLE FOR ANY PROBLEMS/DAMAGE YOU MAY OR MAY NOT EXPERIENCE AFTER PERFORMING THE FOLLOWING MODIFICATIONS!
DISCLAIMER #2: INTEL IS PLANNING TO REMOVE LEGACY BIOS SUPPORT FROM IT'S UEFI FIRMWARE SOMEWHERE AROUND THE YEAR 2020! IF AND WHEN THIS HAPPENS, THIS TUTORIAL WILL NOT BE APPLICABLE, SINCE WINDOWS 7 CAN NOT BE BOOTED ON PURE UEFI FIRMWARE!
DISCLAIMER #3: BEFORE YOU CONTINUE READING, DO MAKE SURE YOUR MOTHERBARD SUPPORTS BOOTING OLD OPERATING SYSTEMS(SUCH AS WINDOWS 7)! YOU'RE LOOKING FOR COMPATIBILITY SUPPORT MODULE(CSM) OR FOR AN OPTION THAT EXPLICITLY IMPLIES SUPPORT FOR WINDOWS 7! IF YOUR MOTHERBOARD DOES NOT HAVE CSM OR IS SIMPLY MADE WITH PURE UEFI FIRMWARE AND NO LEGACY BIOS SUPPORT, STOP HERE, THIS TUTORIAL WILL NOT HELP YOU!
==========================================================================
Let's say for example you bought a new Intel Kaby Lake PC: a fancy Core i7 7700K with an even fancier Z270 motherboard and a Samsung NVMe SSD. You want to install windows 7 on it, but, after the hassle of making it boot and installing it, you end up with non-working usb ports(thus no way to use a mouse/keyboard/flash sticks) and for whatever reason you do not have easy access to PS/2 peripherals. How are you supposed to install the needed drivers and proceed with using the PC? Well, here's where you learn how to prepare a windows 7 iso for your brand new PC.
The entire process consists of:
- using windows 10's install PE - native UEFI, NVMe and USB3.x support, easy initial boot.
- offline driver integration into windows 7 to ensure basic functionality of the usb ports and anything else that NEEDS to work immediately after installing windows.
I'll be using an
You must be registered for see links
as an example, since it has USB3.x coming from both the Intel Z270 chipset and a third-party ASMedia controller(nice example of multiple different drivers).What we'll need to perform the modification:
1.
You must be registered for see links
- works on windows 7/8.x/10 (32bit/64bit)If you're using XP/Vista, you should google for an appropriate version of DISM for your OS.
2. A windows 7 iso - if you wish to run the modified Windows 7 on UEFI-CSM with GPT partitions, you MUST use an x64 iso. x86 DOES NOT boot on UEFI, period.
I recommend using an iso with integrated updates to save yourself the trouble of updating after installation.
3. A windows 10 iso - I prefer using the latest version, just to be sure.
We'll only be using the installation PE because of the native UEFI, NVMe and USB3.x support.
4. A program which can extract files from a container - I use 7-zip.
5. A program which can work with iso files - I use PowerISO.
6. Your respective motherboard's USB/NVMe/other essential drivers.
Bare in mind that for x86 windows you only need x86 drivers, and for x64 windows, respectively, x64 drivers.
7. A few empty folders.
==========================================================================
Step 1. Basic environment preparations
For the sake of ease and convenience, we'll create a few folders, a total of 3. Keep the names short and easy so you have less chance of typos.
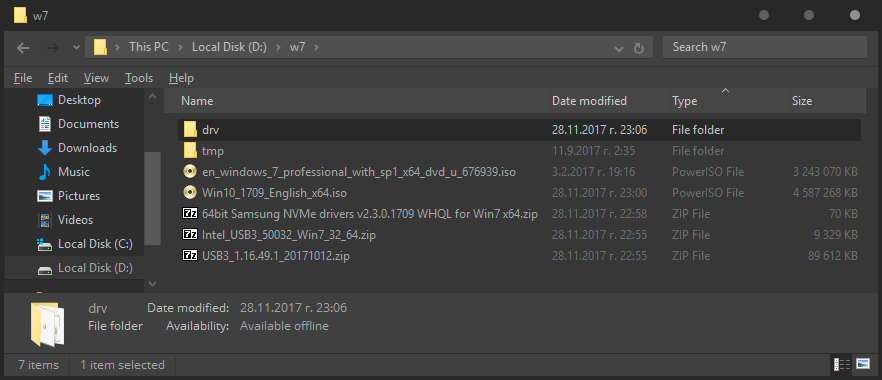
1. I'll use my Local Disk ( D: ) partition and create a folder(w7, short for windows 7). Then, in that folder, I'll create a driver folder(drv) where we'll keep the needed drivers, and a temporary folder(tmp) which will be used for mounting.
2. In the main folder(w7) I'll put a windows 7 and a windows 10 iso, and the download drivers from the motherboard and samsung websites.
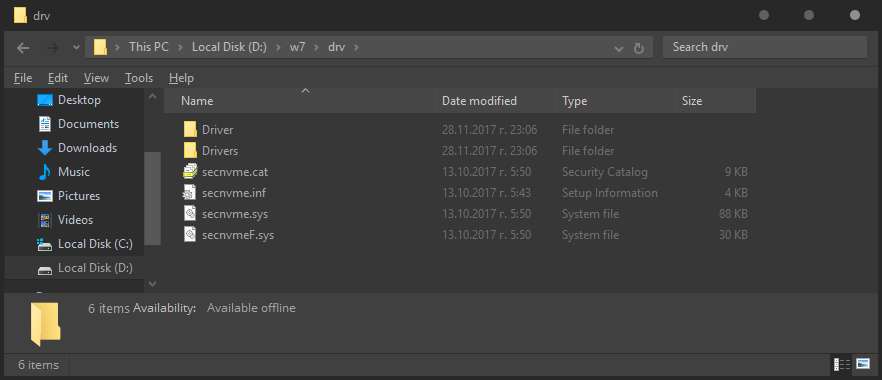
3. In the driver folder(drv) I'll extract the drivers I've downloaded.
[IMPORTANT] For the driver integration we need the .cat, .inf and .sys files to be extracted in a folder. DISM can not integrate drivers from inside a container file. If you come across a driver package that doesn't contain the needed files, it means they are inside some other container file(might be archives, might be .exe files, might be some other file extension). Don't be afraid to open such containers(I do that with 7-zip) and look for the needed files inside.
Step 2. Preparing a base iso
Preparing a base iso now saves you the time of having to find a windows 7 iso and extract the needed files from it when you decide to perform this modification again in the future.
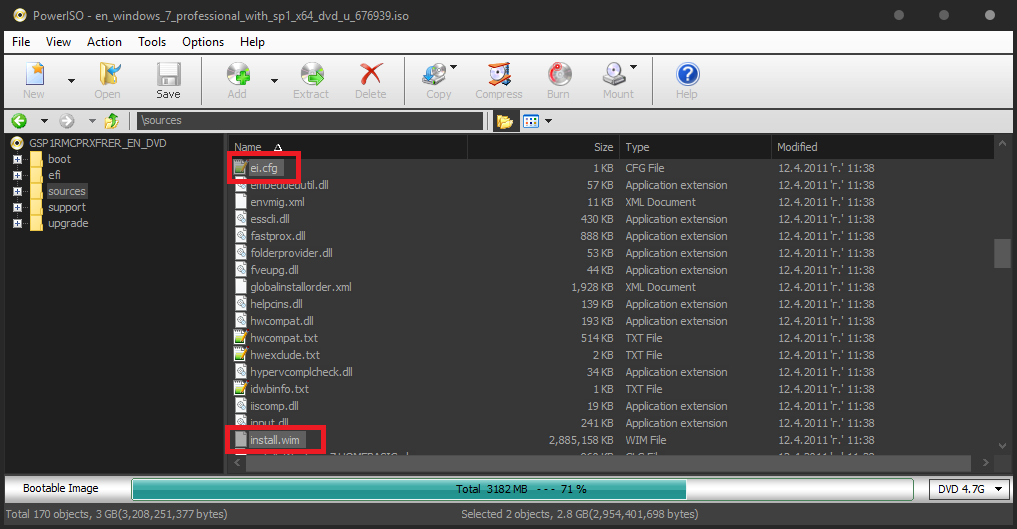
1. First, you need to extract windows 7's ei.cfg and install.wim. They are both located inside the sources folder. Doesn't matter how you do it, as long as you do it.
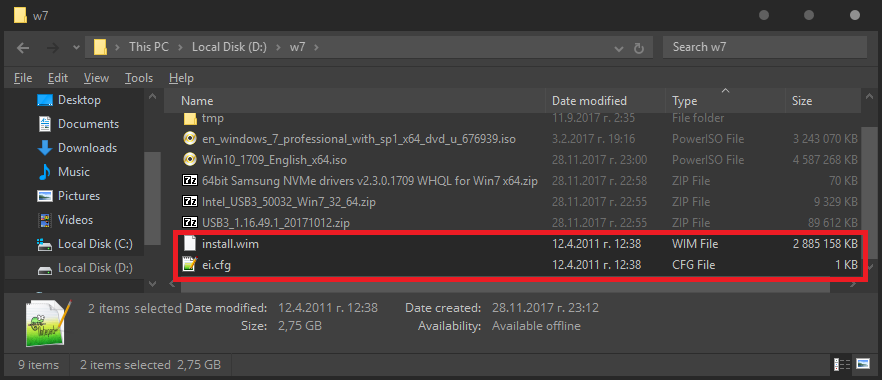
2. Second, open the windows 10 iso(I'll use PowerISO), from the same sources folder delete the ei.cfg and install.wim(or install.esd) and put in the ei.cfg and install.wim you extracted earlier from windows 7. Save the change. You can rename the iso the whatever you like. Windows 7 x64, for example.
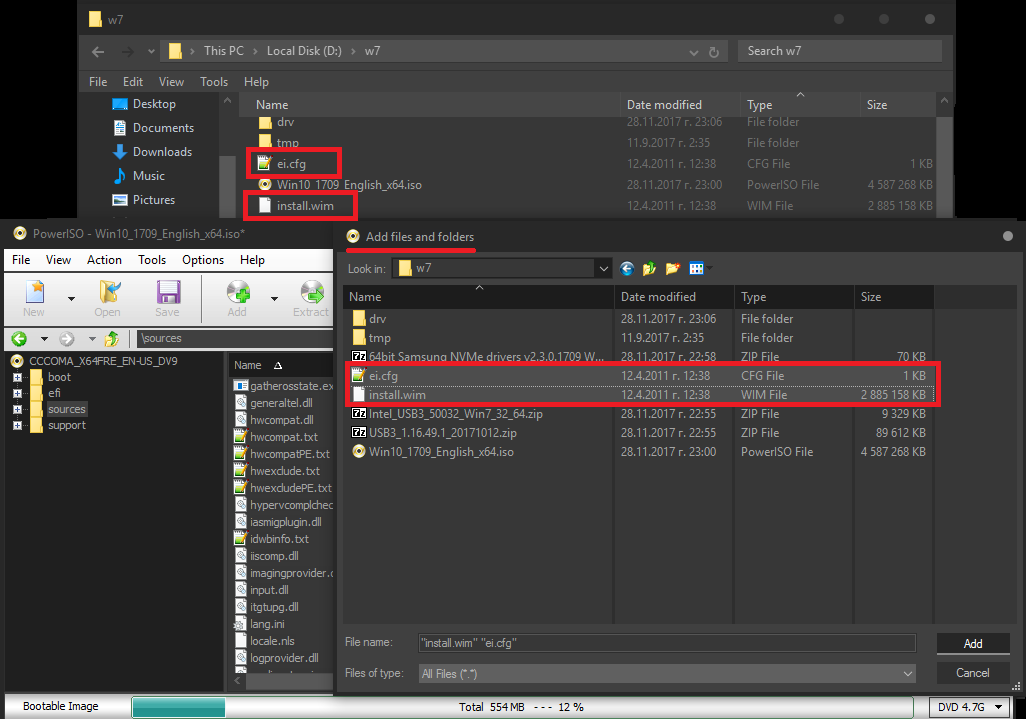
You now have your base image. Copy it somewhere for safe keeping, because we well be making changes to the one in w7 folder.
Step 3. Mounting and driver integration
1. You will need to determine what indexes are contained inside the install.wim you extracted. Open command prompt(cmd) as administrator. Execute the following command:
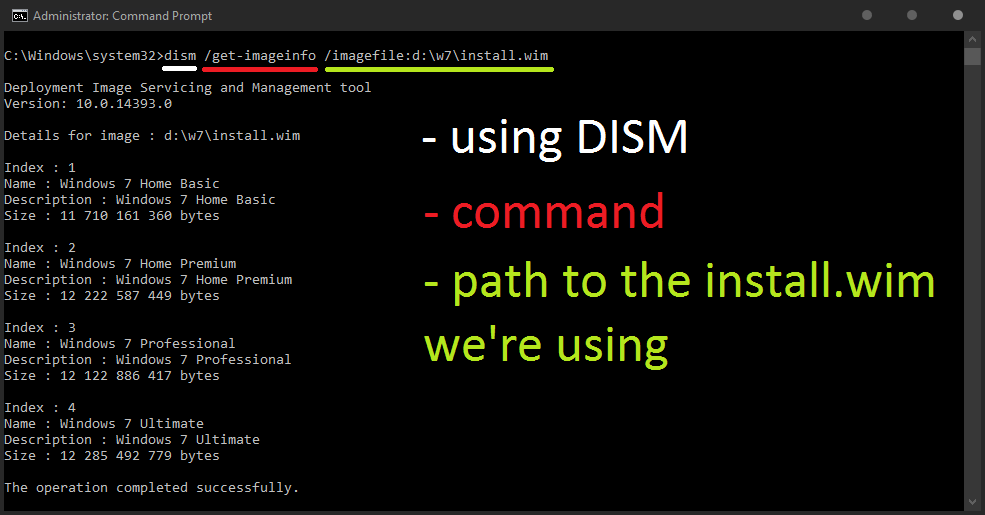
Since I extracted the install.wim from a Professional iso, the install.wim contains all indexes(home basic/home premium/pro/ult). In general, all oem_slp channel editions(starter/homebasic/homepremium/professional/ultimate) contain all indexes. The ei.cfg inside the iso determines which edition you're allowed to install. If you delete the ei.cfg and boot the iso, you'll see and be able to install any of those editions - you have an AIO. KMS channel editions(professional VL/enterprise) contain only one index respectively. So, for this tutorial I'll be using Professional(index 3).
2. Time to mount the desired index. This is where the tmp folder comes in. Execute the following command:
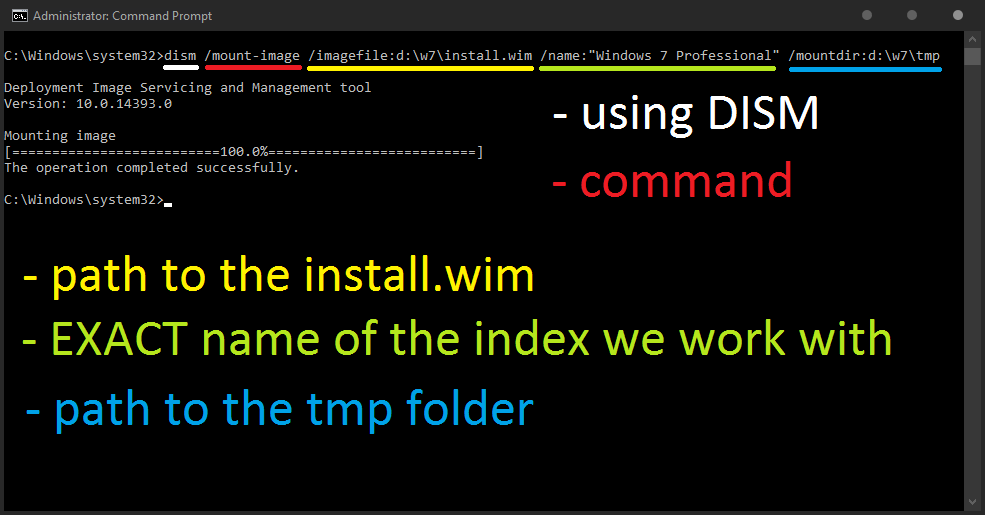
You have mounted the desired index in the tmp folder.
3. Now we can integrate the drivers we extracted to the drv folder. Execute the following command:
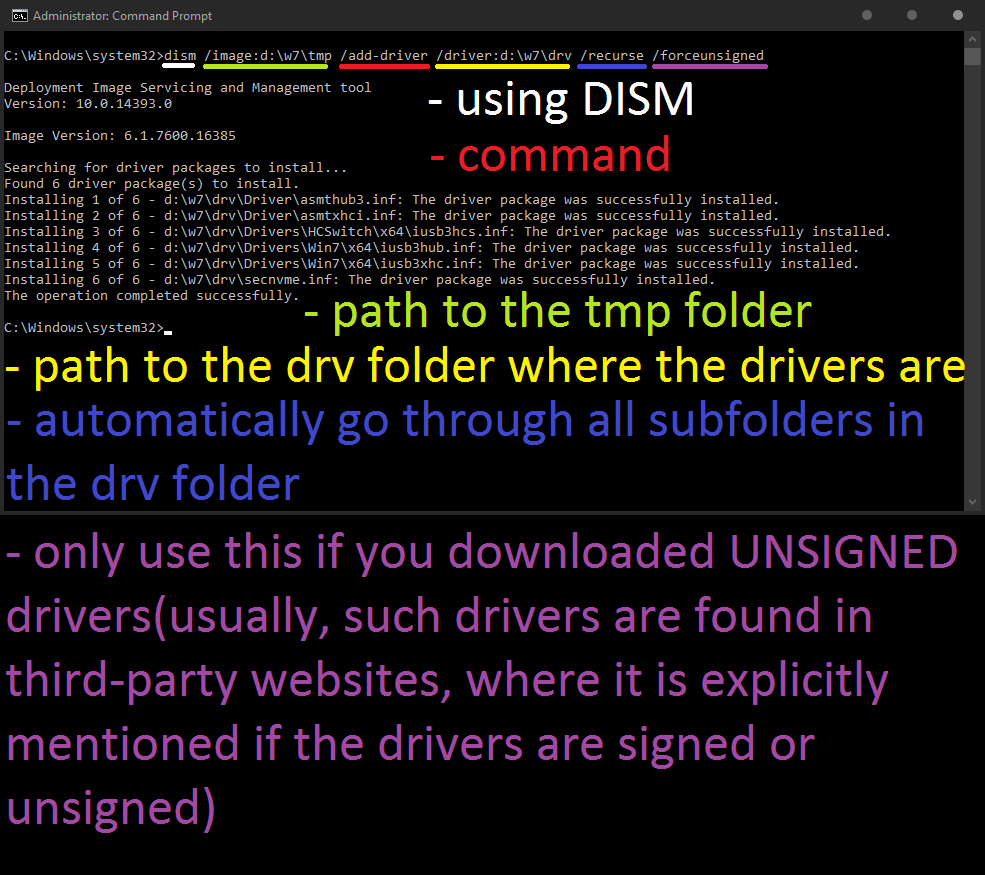
Drivers are now integrated into windows 7. You can double check by executing dism /image:d:\w7\tmp /get-drivers , but I will not be doing that right now.
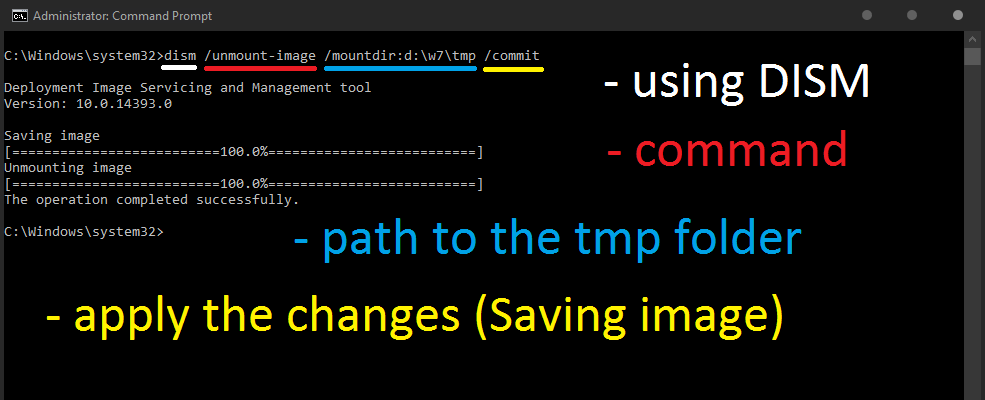
4. Now it's time to apply the changes we made and unmount the image. Execute the following command:
Step 4. Putting the modified install.wim inside the base iso
You're basically repeating the second part of Step 2. - open the base iso, delete it's install.wim and put in the install.wim you just finished modifying. Save the changes.
You can now proceed to making a bootable USB or whatever, and install the modified windows 7.
Needless to say, while you're at it, you can also integrate your LAN/audio/graphics and other drivers.
Last edited:
")
