Actually this problem occurs if a desktop.ini, autorun.inf, etc file is present in the root of the drive. It overwrites the custom label/name of the drive and forces Windows Explorer to show default “Local Disk” label for the drive.
To fix this issue, you just need to delete these files from the root of the drive. These files might be put by a virus/spyware in your computer and even after scanning and removing the malware using an antivirus/anti-spyware software, these files might remain on the drive.
To delete these files and show custom drive label in Windows Explorer, follow these simple steps:
1. Open Windows Explorer (File Explorer/This PC/My Computer) and then open
Folder Options. If you are using Windows 8/8.1 or Windows 10, you need to click on “
View” tab in the ribbon and then click on “
Options” button present at the end of the toolbar. In Windows Vista and Windows 7, you need to click on “Organize” menu present in the command bar. You can also press ALT key to temporary show Menu bar and then click on “Tools -> Folder Options” menu.
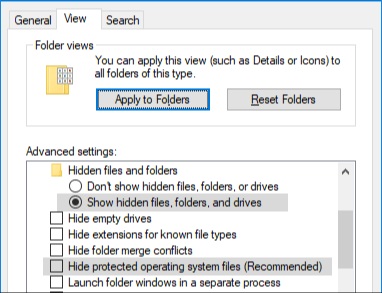
2. In Folder Options window, go to “
View” tab and select “
Show hidden files, folders, and drives” option. Also uncheck/disable “
Hide protected operating system files (Recommended)” option.
Apply changes and close Folder Options window.
3. Now open the drive which is not showing custom label and look for any of following files:
- Desktop.ini
- Autorun.inf
- Thumbs.db
- lpk.dll
- libeay32.dll
- ssleay32.dll
If you find any of these files present in the drive, delete the file.
That’s it. Now close Windows Explorer and re-open it. Now Windows Explorer will start showing your custom label for the drive.